Installing shelves with brackets is a manageable DIY project when you match the brackets, fasteners, and tools to the wall and the load the shelf will carry. Accurate measuring matters, but secure mounting matters more: locate framing when possible, check for concealed utilities before drilling, follow the shelving manufacturer’s hardware instructions, and verify level before you load the shelf.
Quick Answer
To install shelves with brackets, identify the wall type, locate studs and hidden utilities, mark a level reference line, and fasten each bracket with hardware rated for that wall and load. Attach the shelf to the brackets, recheck level, and load it gradually. When possible, anchor brackets into framing rather than drywall alone.
Key Takeaways
- Use the bracket or shelving manufacturer’s specified screws, anchors, and spacing instead of choosing fasteners only because they fit the hole.
- Mount into wall studs or other structural backing whenever the system allows; use properly rated anchors when framing is unavailable.
- A tape measure, level, stud finder or wall scanner, drill/driver, correct bits, pencil, and suitable fasteners are more important than optional cleanup or styling accessories.
- Check for concealed wiring, pipes, and other hazards before drilling into a wall.
- The finished shelf is only as strong as its weakest component: shelf board, brackets, fasteners, wall anchors, or wall structure.
At a Glance
| Time Required | About 45–90 minutes for a straightforward shelf; tile, masonry, difficult framing, or multiple shelves can take longer. |
| Difficulty | Beginner to intermediate, depending on the wall material and shelf load. |
| Tools Needed | Tape measure, pencil, level, stud finder or wall scanner, drill/driver, correct drill bits, screwdriver, safety glasses, brackets, and manufacturer-approved screws or anchors. |
| Cost | Varies mainly with the shelf, brackets, wall anchors, and whether you already own the drill, level, and wall-detection tools. |
Affiliate disclosure: This article contains Amazon affiliate links. If you buy through a qualifying link, we may earn a commission at no extra cost to you.
Warning: Do not drill blindly into walls. Electrical cables, plumbing, gas lines, metal, and other hidden objects may be present. The Electrical Safety Foundation International advises extreme caution when drilling or cutting where wiring or water pipes could be concealed. Wall scanners reduce risk but are not infallible, so use building plans and other clues when available. If you cannot determine what is behind the drilling point, stop and get qualified help.
Top Picks
|
Category |
Product |
Editorial Fit Score |
|---|---|---|
|
🎯 Best for Measuring |
94/100 |
|
|
💼 General Screw Assortment |
91/100 |
|
|
🚀 Optional Non-Marring Mallet |
88/100 |
|
|
⭐ Optional Cleanup Aid |
86/100 |
|
|
🎨 Optional Shelf Styling |
74/100 |
How We Picked These Tools
We evaluated the supplied products by their usefulness during measuring, fastening, adjustment, cleanup, and final styling. The scores above are editorial fit scores for this project, not laboratory test results. A high score does not override the instructions supplied with your brackets, anchors, shelf, or wall-mounting system.
Accuracy and hardware compatibility matter most. A measuring tool can help you create a clean layout, while screws are useful only when their diameter, length, head style, material, and intended substrate match the shelving system. Optional items such as the mallet, cleaning pad, and tissue-box cover may improve workflow or appearance, but they are not substitutes for a level, stud finder or wall scanner, drill/driver, suitable bits, or rated anchors.
Tools And Materials You Actually Need
|
Tool or Material |
Why You Need It |
|---|---|
|
Tape measure |
Sets shelf height, bracket locations, overhang, and spacing. |
|
Pencil or removable marking tape |
Marks stud centers, bracket holes, and the level reference line. |
|
Level or laser level |
Keeps multiple brackets on the same horizontal reference. |
|
Stud finder or wall scanner |
Helps identify framing and, with suitable detectors, some concealed metal or live wiring. |
|
Drill/driver and correct bits |
Creates pilot or anchor holes and drives compatible fasteners without unnecessary wall damage. |
|
Brackets and shelf board |
Must be sized for each other and rated for the intended use. |
|
Manufacturer-specified screws or anchors |
Connect the brackets to the actual wall structure. Hardware must match the substrate and expected load. |
|
Screwdriver |
Useful for final hand-tightening where more control is needed than a power driver provides. |
|
Safety glasses |
Protect your eyes from drilling dust and debris. |
|
Stable step ladder, if needed |
Provides safer access for higher shelf positions. Follow the ladder manufacturer’s instructions and avoid overreaching. |
Choose The Right Fasteners For The Wall
Do not choose a screw or anchor only because it fits through the bracket hole. Shelf strength depends on the wall material, bracket system, fasteners, anchors, shelf board, bracket spacing, and installation quality. Use the lowest applicable capacity in that chain as your practical limit rather than assuming that several individual anchor ratings can simply be added together.
Note: Fastener and spacing requirements are system-specific. For example, ClosetMaid’s Universal Wood Shelf Bracket instructions specify #12 × 2-inch pan-head screws into studs and no more than 32 inches between brackets, while Rubbermaid FastTrack instructions use a different rail, anchor, and stud pattern. Follow your own system rather than copying another product’s dimensions.
|
Wall Type |
Typical Approach |
Main Caution |
|---|---|---|
|
Drywall over wood studs |
Locate the stud center and use the bracket manufacturer’s specified stud fasteners whenever practical. |
Do not assume every wood screw is an acceptable structural fastener for the bracket. |
|
Drywall without a usable stud |
Use an anchor system specifically rated for the wall construction and application. |
Anchor capacity changes with drywall thickness, installation quality, loading direction, and product design. |
|
Concrete or masonry |
Use the specified masonry bit and compatible concrete or masonry anchors. |
Anchor diameter, embedment, hole size, and substrate condition all matter. |
|
Tile over a wall |
Use a bit appropriate for the tile material, drill carefully through the finish, and anchor into the proper substrate or framing behind it. |
Tile itself should not be treated as the structural support unless the mounting system specifically says otherwise. |
|
Plaster and lath |
Locate framing where possible and use hardware suitable for plaster/lath when framing cannot be used. |
Aggressive drilling or unsuitable anchors can crack brittle plaster. |
A shelf does not have one independent “weight rating.” Its safe capacity depends on the complete assembly, including the wall, anchors or studs, fasteners, brackets, shelf material, span, and installation.
How To Install Shelves With Brackets
1. Plan The Shelf Height And Load
Decide what the shelf will hold before drilling. Books, cookware, tools, and large containers create very different loads from framed photos or lightweight decor. Choose a shelf board and brackets intended for the planned depth and use, then read their installation instructions before marking the wall.
2. Locate Studs And Check For Hidden Utilities
Scan the mounting area for framing and potential concealed hazards. Mark the centers of usable studs rather than only their edges. Treat areas around outlets, switches, plumbing fixtures, and other services with extra caution, but do not rely on visual alignment alone to determine what is behind the wall.
If the shelf is high enough to require a ladder, use a stable ladder on level footing, keep your body between the side rails, and avoid overreaching. OSHA’s portable-ladder guidance recommends three points of contact while climbing and warns against using the top step unless the ladder is designed for it. See OSHA Portable Ladder Safety.
3. Mark A Level Reference Line
Measure the desired shelf height from a consistent reference point. Make a light mark, then use a level or laser level to transfer that height across the mounting area. Check the line again before drilling; correcting pencil marks is easier than patching misplaced holes.
Pro Tip: Mark the bracket hole locations while the bracket is physically held against the level line. This reduces errors caused by measuring hole offsets separately from the bracket.
4. Set Bracket Spacing
Place the brackets according to the shelf and bracket manufacturer’s instructions. Do not apply one spacing rule to every shelf. Some systems permit wider spacing than others, and longer or more flexible shelf boards may need additional support even when the brackets themselves are strong enough.
Keep excessive unsupported shelf overhang to a minimum and use the shelf maker’s stated limit when one is provided.
5. Drill The Correct Pilot Or Anchor Holes
Use the correct bit for wood framing, drywall anchors, masonry, tile, or other substrate. The hole diameter for an anchor is part of the anchor system; an oversized or undersized hole can reduce holding performance. Drill straight unless the specific product instructions say otherwise.
When drilling into framing, use a pilot-hole size appropriate for the specified screw and material so you reduce splitting without creating an overly loose connection.
6. Install Anchors And Fasten The Brackets
Install any required anchors exactly as their manufacturer directs. Position each bracket on the reference line, start all fasteners, check plumb and level, and then tighten progressively. Secure is the goal; excessive tightening can crush drywall, strip a hole, distort a bracket, or damage some anchors.
7. Attach The Shelf To The Brackets
Center the shelf board and confirm the intended overhang on each side. If the brackets include holes for fastening the shelf from below, use screws of the specified diameter and a length that provides adequate grip without protruding through the top surface. Recheck the shelf with a level after fastening.
8. Load The Shelf Gradually And Recheck It
Apply weight gradually rather than loading the shelf to its intended maximum immediately. Watch for bracket movement, anchor rotation, wall crushing, unusual flex, or shelf sag. Stop using the shelf if anything shifts. Recheck fasteners after the shelf has been in use and after any major change in load.
Common Shelf-Installation Mistakes
- Using a generic screw simply because it fits through the bracket hole.
- Assuming all drywall anchors have the same capacity.
- Multiplying individual anchor ratings without the system manufacturer saying that is valid.
- Ignoring the shelf board’s tendency to sag between brackets.
- Using one bracket-spacing rule for every product.
- Drilling without checking for wiring, pipes, and other concealed hazards.
- Over-tightening screws until drywall or anchors deform.
- Failing to secure the shelf board to brackets when the bracket design requires it.
- Using a step ladder while overreaching or standing on a prohibited top step.
- Using optional accessories, such as a mallet, where the anchor or bracket instructions do not call for them.
Umbra Casa

The Umbra Casa is not a shelf-installation tool. It is an optional styling accessory you can place on a finished shelf after the mounting work is complete. The house-shaped polypropylene cover fits a standard cube-style tissue box and dispenses tissues through its chimney opening.
Umbra currently lists the Casa at approximately 5 × 5 × 6.75 inches and describes it as easy-clean polypropylene. You can verify the current product specifications on the Umbra Casa product page.
What People Say
The supplied source dataset characterizes customer sentiment as positive, especially around the playful appearance, simple fit, and easy-clean shell. Treat the chart and marketplace rating below as a snapshot from the supplied article rather than a live measurement of current reviews.
Overall Sentiment: Positive in the supplied source dataset

Long-Term Value
The molded cover is washable and reusable, so its value comes from long-term appearance and convenience rather than shelf-installation performance.
Return On Investment
Its return is mainly aesthetic: one reusable cover can hide disposable tissue-box graphics and create a consistent look on a shelf, desk, or counter. It does not improve bracket strength or installation quality.
Situational Benefits
|
Situation |
How It Helps |
|---|---|
|
Guest Bathroom |
Hides branded tissue-box graphics and creates a more deliberate decorative finish. |
|
Kids’ Rooms |
The house shape adds a playful accent while keeping tissues accessible. |
|
Office Desk |
Keeps a standard tissue box visually contained alongside other desktop accessories. |
Ease Of Use
|
Feature |
Ease Level |
|---|---|
|
Setup |
Very Easy |
|
Tissue Access |
Easy |
|
Cleaning |
Easy |
|
Storage |
Easy |
Versatility
Because it fits standard cube-style tissue boxes, it can move among bathrooms, bedrooms, offices, and finished shelving displays.
Aesthetic Appeal
The minimal house silhouette and chimney opening add a whimsical detail without requiring permanent installation.
Practicality
Its practical role is limited to covering a tissue box and making the finished shelf look tidier. The polypropylene shell can be wiped clean with a damp cloth.
Problem Solving
It solves a decorative problem rather than an installation problem: it hides the printed cardboard tissue box while keeping tissues accessible.
Key Benefits
- Transforms a standard cube tissue box into a decorative accent
- Easy-clean polypropylene construction
- Fits standard cube-style tissue boxes
- Optional finishing accessory rather than required installation equipment
Source-data rating snapshot: 4.5/5 (12,989+ reviews shown in the supplied article; live marketplace totals may change).
Mr. Pen Screws
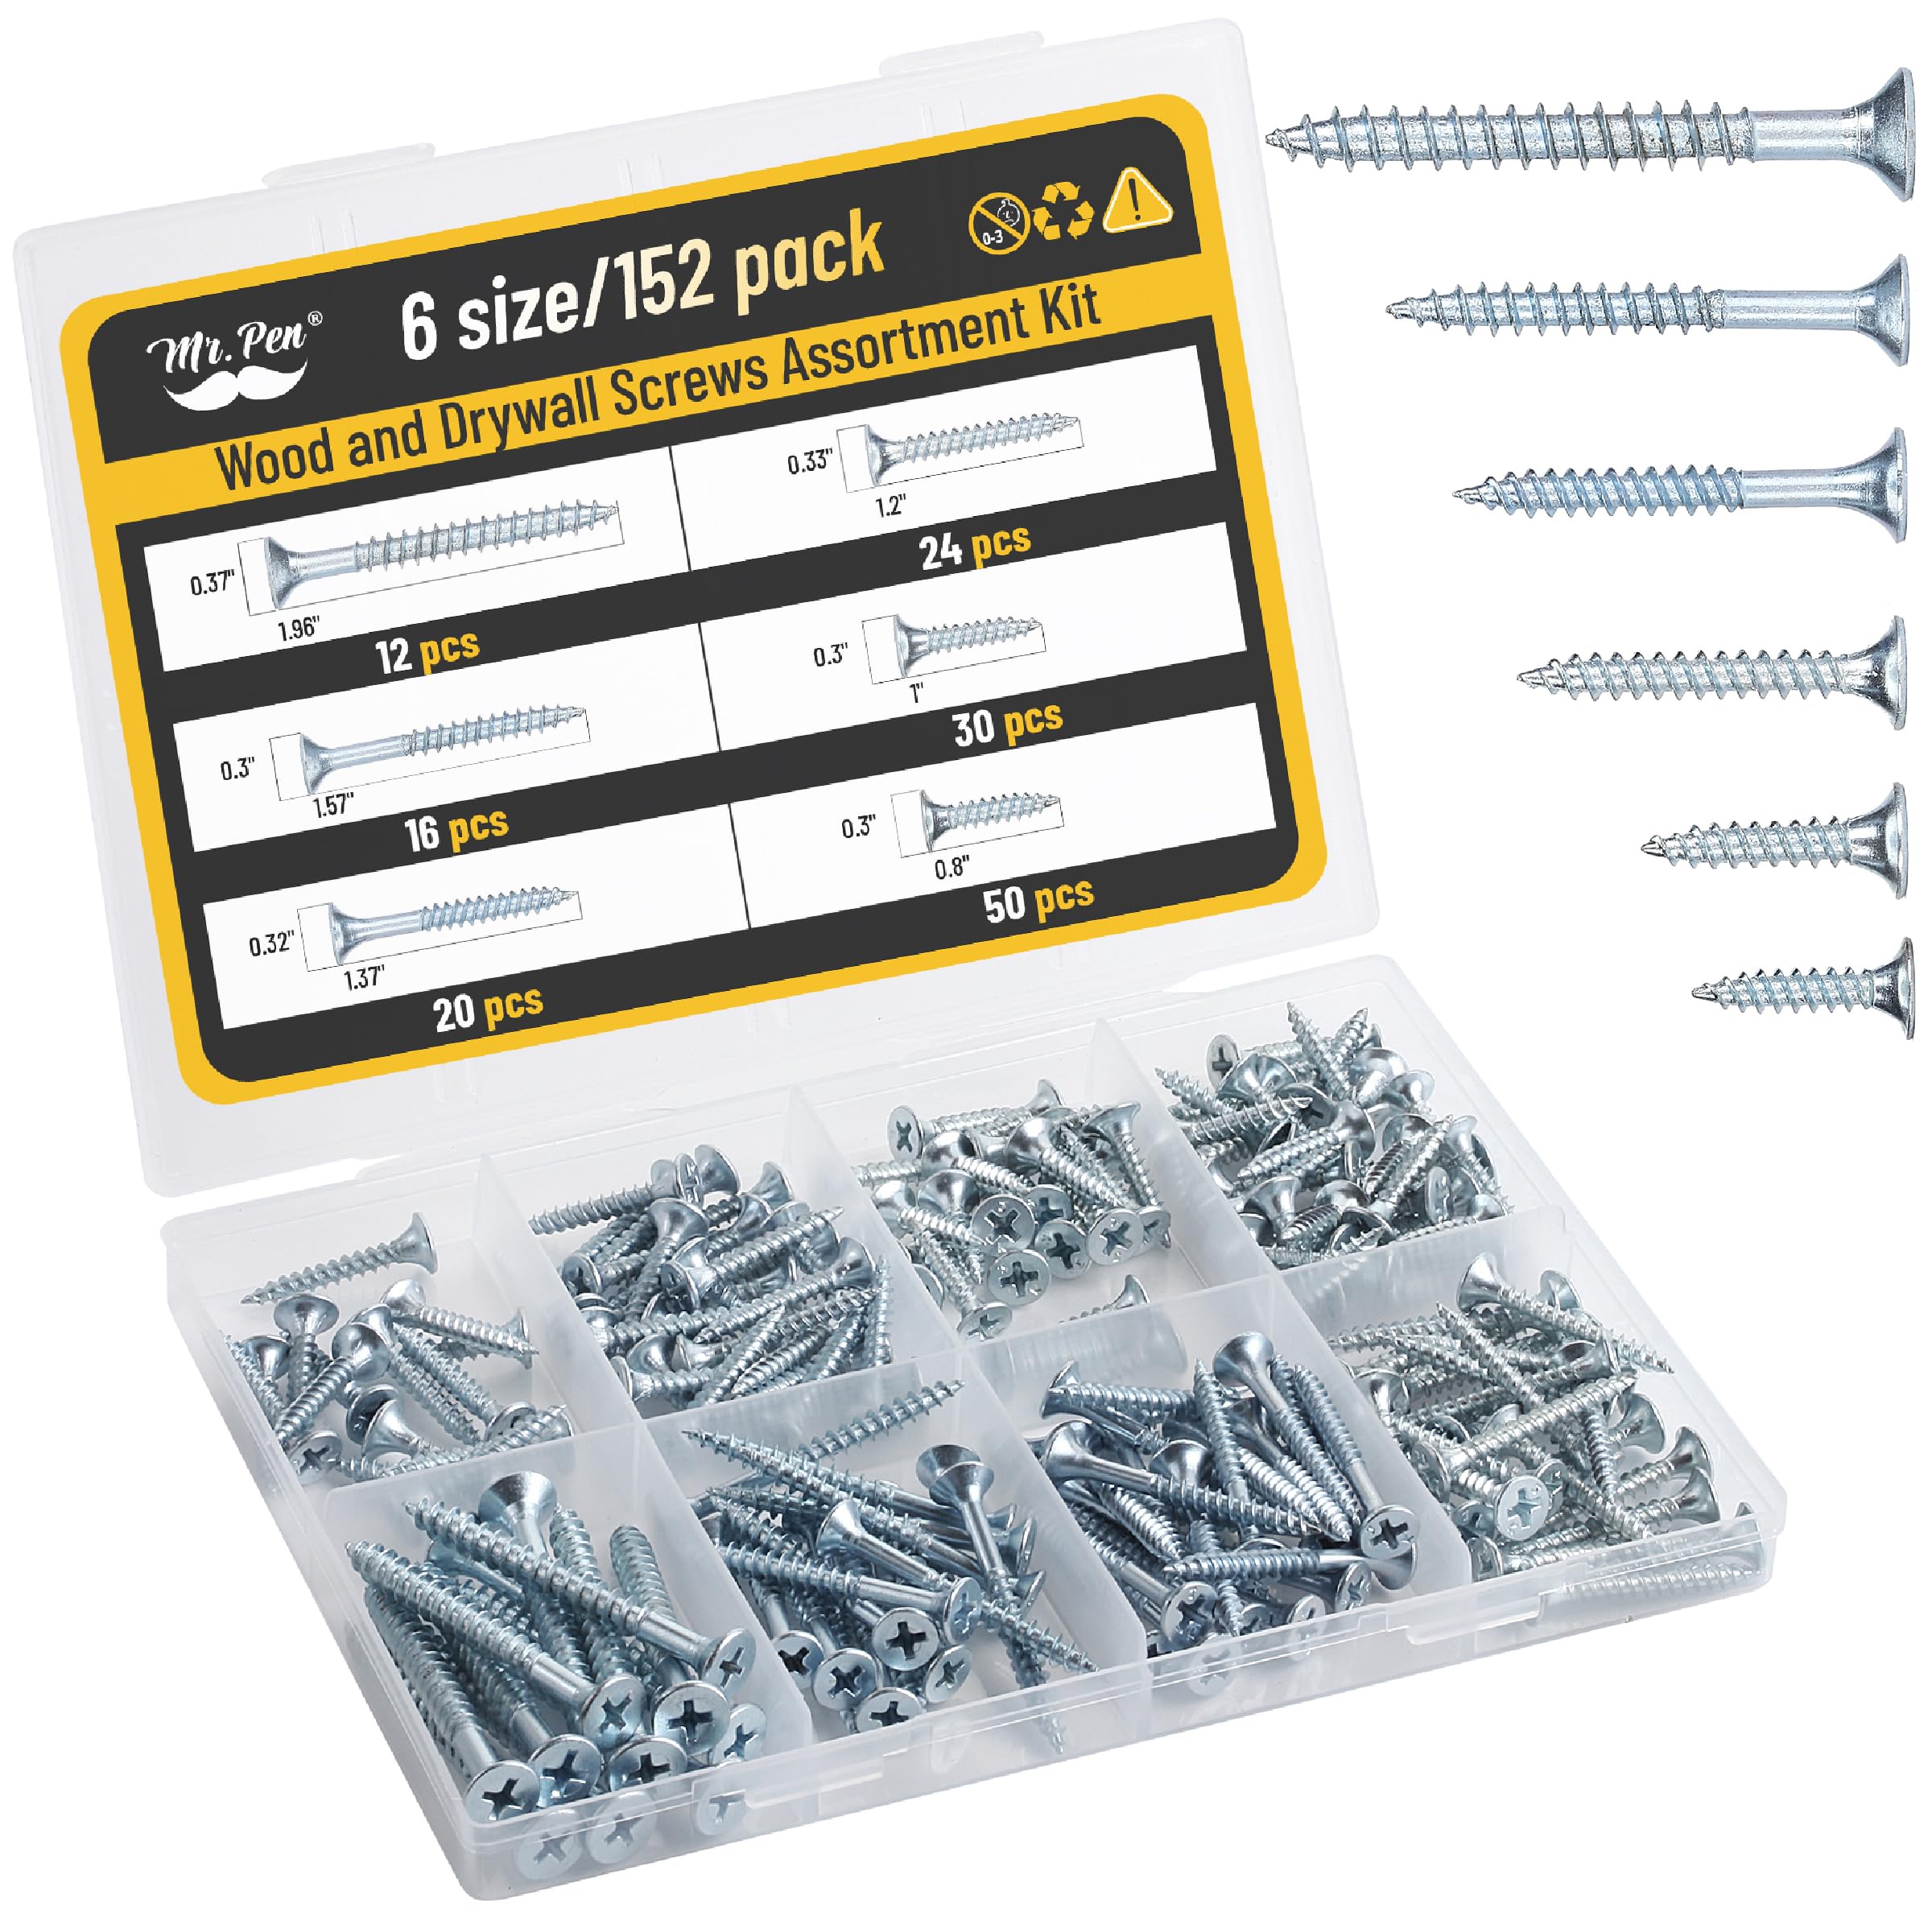
The Mr. Pen assortment can be convenient for general woodworking and household repairs because it keeps several common screw lengths together. For shelf brackets, however, convenience comes second to specification: use one of these screws only when its diameter, length, head style, material, and intended substrate match the bracket or shelving manufacturer’s requirements.
These wood screws do not replace rated drywall anchors, masonry anchors, or specialty fasteners when the installation requires them.
Warning: Do not substitute a generic screw assortment for the fasteners specified by a structural shelving or bracket system. A screw that fits through the bracket hole can still be the wrong diameter, length, head type, or material for the installation.
What People Say
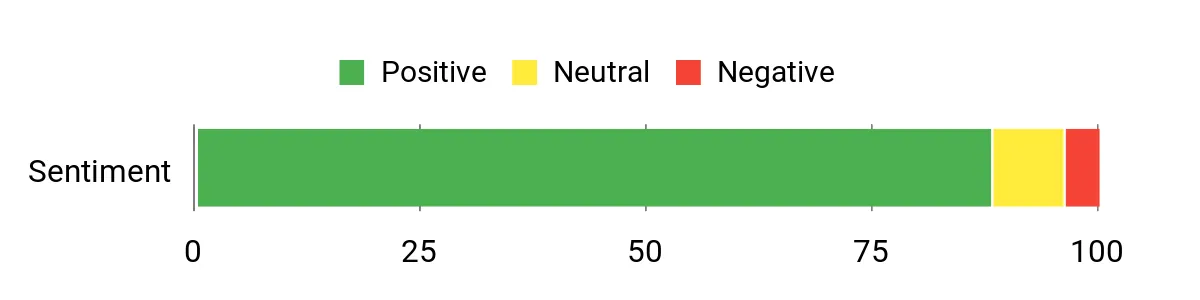
The supplied review dataset describes positive sentiment around having multiple sizes in one case and the convenience of an organized assortment. Those comments support its usefulness as a general hardware kit, but they do not establish a universal shelf-load rating.
Overall Sentiment: Positive in the supplied source dataset
Long-Term Value
An assortment can save trips for ordinary repair work, provided you identify each screw correctly and use it only in an application for which it is suitable.
Return On Investment
The value comes from having several lengths ready for compatible jobs. Using an incorrect screw to avoid buying the specified hardware creates more risk than savings, so always prioritize the mounting instructions.
Situational Benefits
|
Situation |
How It Helps |
|---|---|
|
Installing Shelf Brackets |
Provides multiple screw lengths, but only use a screw when it matches the bracket maker’s required specification and wall substrate. |
|
Small Repairs |
Useful when hinges, trim, or ordinary wood projects call for one of the included sizes. |
|
Furniture Assembly |
Can provide replacement wood screws when the required dimensions and head style match the original hardware. |
Ease Of Use
|
Feature |
Ease Level |
|---|---|
|
Selecting Size |
Easy once the required fastener specification is known |
|
Driving |
Easy with a matching driver bit and suitable pilot hole |
|
Organization |
Easy |
|
Refilling |
Moderate |
Versatility
The assortment covers several common wood-screw lengths, so it is more versatile for general household work than a single-size box. That versatility does not make every screw suitable for wall mounting.
Aesthetic Appeal
The divided organizer keeps loose fasteners contained and makes a workbench or tool shelf easier to manage.
Practicality
The main practical advantage is organization. For shelf installation, check the exact screw requirement first, then see whether the kit contains a matching fastener.
Problem Solving
It solves the problem of keeping several common wood-screw lengths available, but it does not solve the separate problem of choosing a correctly rated anchor or mounting system for drywall, masonry, or other wall types.
Key Benefits
- Several common wood-screw lengths in one organizer
- Easy size access for compatible household projects
- Phillips flat-head format across the supplied assortment
- Useful general hardware kit when its screws match the job specification
Source-data rating snapshot: 4.7/5 (4,114+ reviews shown in the supplied article; live marketplace totals may change).
Coleman Mallet

The Coleman rubber mallet is an optional striking tool, not a core shelf-mounting tool. Its softer rubber head can be useful for controlled, non-marring taps during compatible assembly work, but you should not hammer shelf anchors or brackets unless their installation instructions specifically call for it.
Coleman markets this product primarily for camping. Its built-in hook is designed to remove tent stakes, not wall anchors. The Coleman product page describes a double-sided high-impact rubber head and wooden handle.
What People Say
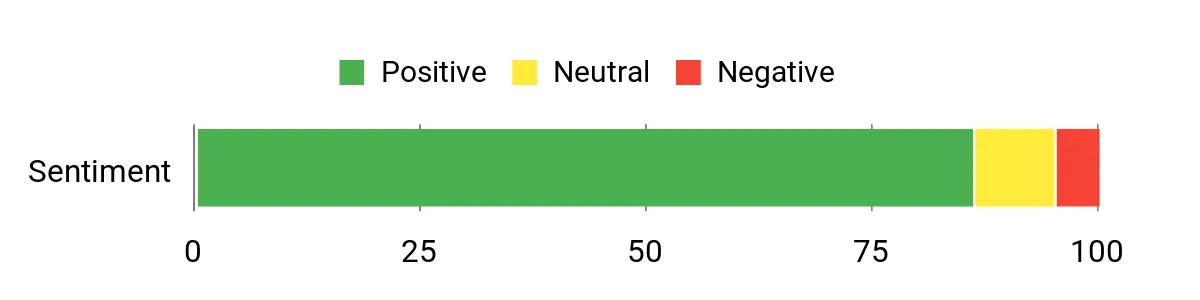
The supplied source dataset summarizes sentiment as positive, particularly for general non-marring striking and outdoor use. Coleman’s own current page contains a much smaller manufacturer-site review set, so marketplace totals should be treated as platform-specific snapshots.
Overall Sentiment: Positive in the supplied source dataset
Long-Term Value
A rubber mallet can remain useful across furniture assembly, light fitting work, and camping. Its value for shelf installation is narrower because most bracket fasteners should be driven or tightened rather than struck.
Return On Investment
For someone who already needs a rubber mallet for camping or household assembly, it adds useful versatility. Buying it solely to install ordinary shelf brackets is usually less important than buying the correct level, detector, drill bits, or anchors.
Situational Benefits
|
Situation |
How It Helps |
|---|---|
|
Compatible Shelf or Furniture Assembly |
Provides gentle taps where an assembly procedure specifically benefits from non-marring force. |
|
Furniture Assembly |
Can seat some joints and dowels with less surface damage than a steel hammer. |
|
Camping and Outdoor Work |
This is its intended role: driving tent stakes and using the hook to remove them afterward. |
Ease Of Use
|
Feature |
Ease Level |
|---|---|
|
Grip and Handling |
Easy |
|
Controlled Strikes |
Easy |
|
Using Hook |
Easy for its intended tent-stake-removal purpose |
|
Transport/Storage |
Easy |
Versatility
The mallet works across camping and light household assembly tasks, but that versatility should not be confused with being required hardware for mounting shelf brackets.
Aesthetic Appeal
Its rubber head and wooden handle have a simple workshop and camping-tool appearance.
Practicality
The mallet is practical whenever controlled impact is appropriate. For bracket installation, a drill/driver and hand screwdriver generally matter more.
Problem Solving
It solves the need for softer striking force where the workpiece can tolerate impact but you want to reduce surface marring. Do not use its tent-stake hook to pull wall anchors.
Key Benefits
- Rubber head for controlled, lower-marring strikes
- Double-sided head
- Wooden handle
- Built-in hook designed for tent-stake removal
Source-data rating snapshot: 4.6/5 (7,053+ reviews shown in the supplied article; live marketplace totals may change).
Mr. Clean Eraser

Mr. Clean Magic Eraser pads are optional cleanup aids rather than installation tools. They can remove some scuffs and marks with water, but they should not automatically be used on every painted or finished surface around a new shelf.
Mr. Clean instructs users to test a small area with light pressure first and lists several surfaces where the product is not recommended, including high-gloss, polished, dark, brushed, satin, faux, bare or polished wood, copper, stainless-steel appliances, non-stick coatings, and vehicle finishes. See the manufacturer’s wall-cleaning guidance.
What People Say
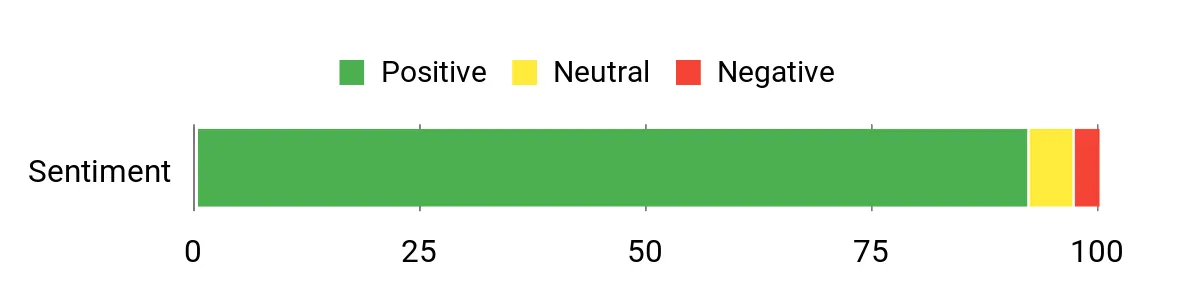
The supplied review dataset reports positive sentiment about quick scuff and grime removal. Surface compatibility remains important, so positive cleaning reviews should not replace the manufacturer’s spot-test instructions.
Overall Sentiment: Positive in the supplied source dataset
Long-Term Value
A multipack can be useful for recurring spot cleaning, but each pad wears down with use and should be treated as a consumable.
Return On Investment
The value comes from fast spot cleanup on compatible surfaces. It does not replace ordinary dust removal after drilling or correct surface preparation for adhesives, paints, or finishes.
Situational Benefits
|
Situation |
How It Helps |
|---|---|
|
Wall Scuffs |
Can remove some marks after a spot test confirms the paint or finish tolerates it. |
|
Bathroom Prep |
Can clean compatible tile and bathroom surfaces before or after shelf work. |
|
Tool Cleanup |
May help with compatible hard surfaces, but follow the cleaner and tool manufacturer’s care instructions. |
Ease Of Use
|
Feature |
Ease Level |
|---|---|
|
Activation |
Easy |
|
Scrubbing Action |
Easy |
|
Surface Compatibility Check |
Required before use |
|
Rinsing/Finish |
Easy where the manufacturer permits use |
Versatility
The pads can work on several household surfaces, but versatility has limits. Follow the product warnings and do not assume that a painted, polished, satin, or wood finish is compatible.
Aesthetic Appeal
The pads are utilitarian, but successful spot cleaning can make the wall around a newly installed shelf look more finished.
Practicality
They are compact and water-activated, which makes them convenient for small compatible cleanup jobs.
Problem Solving
They can address some stubborn marks without requiring a separate liquid cleaner, but inappropriate use can dull or alter certain finishes.
Key Benefits
- Water-activated spot-cleaning pad
- Useful for compatible scuffs and household marks
- Compact and easy to store
- Best used only after a small-area compatibility test
Source-data rating snapshot: 4.7/5 (15,409+ reviews shown in the supplied article; live marketplace totals may change).
Amazon Tape Measure

A tape measure is one of the genuinely essential tools in this roundup. The supplied listing identifies this Amazon Basics model as a 16-foot/5-meter tape with inch and metric scales, making it suitable for locating brackets, checking shelf length, setting overhang, and transferring measurements.
Use the blade lock to hold a dimension while marking, but control the blade as it retracts rather than allowing the hook to snap back into the case.
What People Say
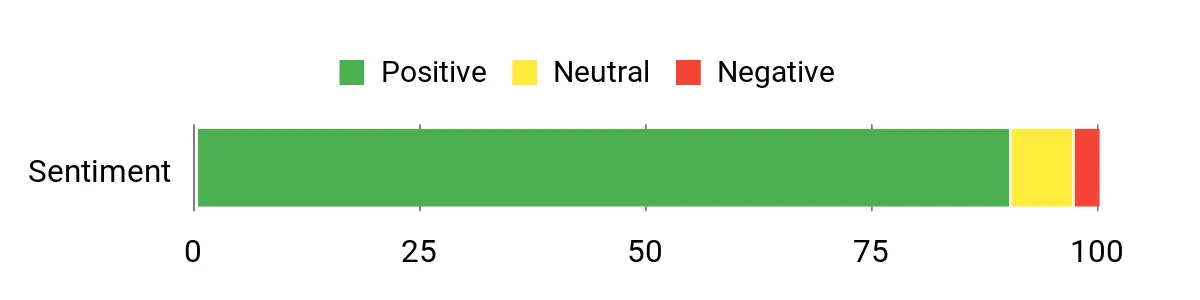
The supplied review dataset describes positive sentiment around readability and general ease of use. As with the other marketplace products, the review count below is a snapshot from the supplied article rather than a guaranteed current total.
Overall Sentiment: Positive in the supplied source dataset
Long-Term Value
A dependable tape measure can serve many household projects beyond shelving. Avoid kinking the blade, retract it under control, and keep dirt out of the case to extend its useful life.
Return On Investment
Accurate measuring reduces misplaced holes, uneven bracket spacing, and wasted shelf material, so a basic tape measure has clear value across repeated DIY work.
Situational Benefits
|
Situation |
How It Helps |
|---|---|
|
Installing Shelf Brackets |
Measures shelf height, stud positions, bracket spacing, and overhang before drilling. |
|
Cutting Shelf Material |
Provides inch and metric measurements for layout and repeat marks. |
|
One-Person Measuring |
The blade lock can hold a measurement while you transfer a mark. |
Ease Of Use
|
Feature |
Ease Level |
|---|---|
|
Grip and Handling |
Easy |
|
Blade Readability |
Easy |
|
Locking Mechanism |
Easy once familiar |
|
Retract Control |
Easy with controlled hand guidance |
Versatility
The 16-foot/5-meter range is useful for shelf layout, furniture measurements, and many ordinary household projects.
Aesthetic Appeal
The yellow-and-black casing is functional rather than decorative and is easy to spot among other tools.
Practicality
Its main advantage is straightforward measurement in both inch and metric scales without requiring a specialty layout tool.
Problem Solving
It reduces guesswork when you need repeatable shelf heights, equal overhang, or measured bracket positions.
Key Benefits
- 16-foot/5-meter measuring range
- Inch and metric scales
- Locking blade for transferring measurements
- Compact format for routine DIY work
Source-data rating snapshot: 4.7/5 (1,490+ reviews shown in the supplied article; live marketplace totals may change).
Frequently Asked Questions
How do I choose the right brackets and hardware?
Match the bracket depth to the shelf, confirm the intended load and spacing in the product instructions, and use fasteners specified for your wall type. When a bracket can be secured to a stud or other structural backing, that is generally preferable to relying on drywall alone. If a stud is unavailable, use a wall-anchor system rated for the substrate and application rather than a generic screw.
What tools and accessories do I need for a professional result?
The core tools are a tape measure, pencil, level, stud finder or wall scanner, drill/driver, correct drill bits, screwdriver, safety glasses, brackets, shelf board, and manufacturer-approved fasteners or anchors. A ladder may be needed for higher shelves. A rubber mallet or cleaning pad is optional and should only be used where the relevant product or surface instructions allow it.
How do I keep shelves level and able to support weight over time?
Start with one level reference line, place brackets according to the manufacturer’s spacing instructions, use the correct anchors or stud fasteners, and secure the shelf to the brackets when the design requires it. Load the shelf gradually and watch for wall damage, anchor movement, bracket rotation, or shelf sag. Recheck hardware after changes in load.
Can I install shelf brackets on drywall without a stud?
Sometimes, but only with an anchor system suitable for the drywall thickness, bracket, loading direction, and expected load. Do not assume a generic plastic plug or ordinary wood screw is adequate. Follow the anchor and bracket manufacturer’s instructions, and use structural framing wherever practical for heavier shelves.
How far apart should shelf brackets be?
There is no universal spacing number. The correct distance depends on the shelf material, shelf thickness, bracket design, mounting system, and load. Use the spacing stated by your shelf or bracket manufacturer. As examples only, ClosetMaid’s Universal Wood Shelf Bracket instructions allow no more than 32 inches between those brackets, while its ShelfTrack system uses different spacing rules.
Customer Preferences
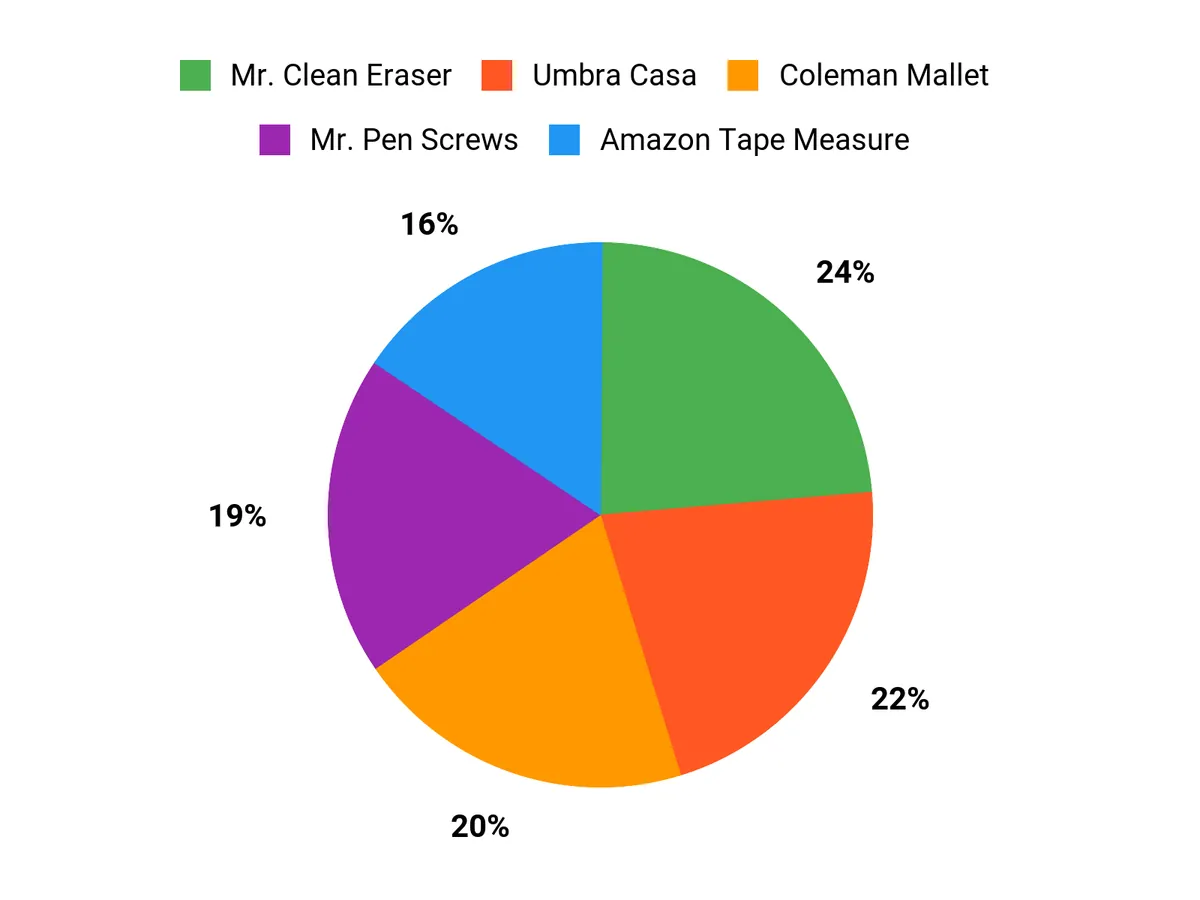
Different buyers prioritize different parts of this project. For the installation itself, measuring accuracy, an accurate level line, correct fasteners, and wall compatibility matter most. The Mr. Pen assortment is useful only when an included screw matches the required specification, while the Coleman mallet and Mr. Clean pads are optional accessories. The Umbra Casa belongs in the styling stage after the shelf is securely installed.
The chart below comes from the supplied roundup dataset and should be read as that dataset’s preference summary rather than a representative survey of all shelf-installation customers.
Wrapping Up
For a secure shelf installation, put the wall and hardware first. Measure the layout, locate framing and concealed hazards, establish a level reference line, and use fasteners that the bracket or shelving manufacturer approves for the actual wall. Install the brackets without over-tightening, secure the shelf board where required, and add weight gradually while watching for movement or sag.
The Amazon Basics tape measure is directly relevant to layout work, while the Mr. Pen assortment can be useful only when a screw matches the required specification. The Coleman mallet and Mr. Clean pads are optional helpers, and the Umbra Casa is purely a styling accessory. None of those products replaces a proper level, detector, drill/driver, compatible bits, or rated mounting hardware.
| Product Name | Image | Rating Snapshot | Material | Dimensions / Size | Weight / Package Note | Special Highlights |
|---|---|---|---|---|---|---|
| Umbra Casa Tissue Box Cover |
|
4.5/5 (12,989 reviews in supplied source snapshot) | Polypropylene | 5″L x 5″W x 6.75″H | Current Umbra page does not list a weight |
|
| Mr. Pen Wood Screws Assortment Kit |
|
4.7/5 (4,114 reviews in supplied source snapshot) | Metal wood screws with silver/zinc-style finish in supplied listing | 152 pieces across six listed lengths from 1/2 in. to 2 in. | Approx. 300 g in supplied source data; not used to determine shelf capacity |
|
| Coleman Rubber Mallet with Tent Peg Remover Hook |
|
4.6/5 (7,053 reviews in supplied source snapshot) | High-impact rubber head and wooden handle | Manufacturer specification table lists a 13.2-inch exterior dimension as the longest measurement | Coleman copy says 16 oz; its specification table lists 1.2 lb |
|
| Mr. Clean Magic Eraser Sponge |
|
4.7/5 (15,409 reviews in supplied source snapshot) | Melamine-foam cleaning pad | Pack and individual-pad dimensions vary by listing | Package-dependent |
|
| Amazon Basics Tape Measure – 16-Feet |
|
4.7/5 (1,490 reviews in supplied source snapshot) | Plastic case and metal measuring blade in supplied listing | 16 ft / 5 m measuring range | 7.04 oz shown in supplied source data; package revisions may differ |
|
Sources
- ClosetMaid Universal Wood Shelf Bracket Installation Instructions — supports manufacturer-specific stud screws, leveling, and bracket-spacing guidance.
- Rubbermaid FastTrack Rail and Shelving Instructions — supports system-specific stud, anchor, drilling, and spacing requirements.
- Electrical Safety Foundation International: DIY Electrical Safety — supports caution around concealed electrical wiring and water pipes when drilling.
- OSHA Portable Ladder Safety QuickCard — supports stable setup, three-point contact, and safe ladder-use practices.
- Mr. Clean: How to Get Scuff Marks Off Walls — supports Magic Eraser spot-testing and surface restrictions.
- Coleman Rubber Mallet With Tent Peg Remover — supports the mallet’s material, camping use, tent-stake hook purpose, and current manufacturer specifications.
This roundup is reader-supported. When you click through affiliate links, we may earn a referral commission on qualifying purchases.