
You can turn a blank bedroom wall into a curated gallery that reflects your style without creating a trail of unnecessary holes or putting framed artwork at risk. The key is to plan the whole arrangement as one composition, test it at full size, choose hanging hardware for the wall and frame weight, and protect valuable photographs or paper artwork from avoidable damage.
Quick Answer
Plan a bedroom gallery wall by choosing one layout style, arranging every frame on the floor first, keeping the gaps visually consistent, and testing full-size paper templates on the wall. Mark each frame’s actual hanger position before making holes, then use hardware rated for the frame’s weight and your wall type.
Key Takeaways
- Treat the complete group of frames as one composition instead of positioning each picture independently.
- A consistent gap of roughly 2–3 inches is a useful starting point for many gallery walls, but scale the spacing to the size and style of your frames.
- Use full-size paper templates to test the layout before making permanent holes.
- Choose hanging hardware according to the wall material, frame weight, hanger design, and the hardware manufacturer’s rated limits.
- Keep valuable photographs and light-sensitive paper artwork away from strong direct sunlight and use appropriate framing materials.
At a Glance
| Time Required | About 1–3 hours for planning and installation, depending on the number of frames and wall type |
| Difficulty | Beginner to intermediate |
| Tools Needed | Tape measure, pencil, level, full-size paper templates, painter’s tape, and suitable picture-hanging hardware; a stud finder or drill may be needed for some walls |
| Cost | Varies mainly with the artwork, frames, and hanging hardware you choose |
Affiliate disclosure: This article contains retailer links. If you purchase through qualifying links, we may earn a commission at no additional cost to you. Product recommendations and editorial scores should be evaluated alongside the manufacturer’s current specifications and your own project requirements.
Plan Your Bedroom Gallery Wall Before Making Holes
A gallery wall is easiest to control when you decide the total footprint first. Measure the usable wall area and note the bed, headboard, nightstands, switches, vents, windows, lamps, and other fixed features that affect the composition.
Do not judge the layout one frame at a time. Stand back and think of the collection as a single large shape. A balanced outer boundary usually looks more intentional than a group whose edges extend randomly in every direction.
Choose a Layout Style
You can build most bedroom gallery walls from one of four simple patterns:
- Grid: matching or similarly sized frames arranged in straight rows and columns. This is the easiest style to keep orderly.
- Horizontal or vertical line: frames share a common centerline, top edge, or bottom edge. It works well over a dresser or along a narrow wall.
- Anchor-piece layout: one larger piece becomes the focal point and smaller frames surround it.
- Salon-style arrangement: several frame sizes and orientations create a looser collection while the overall spacing and visual weight remain balanced.
Choose Frame Sizes, Mats, And Finishes
A gallery wall does not require identical frames, but it helps to repeat at least one visual element. You might use the same frame color, the same mat color, a repeated wood tone, or artwork with a related color palette.
If you want a calm bedroom look, matching frames and generous mats create more structure. For a collected look, mix frame sizes and finishes but repeat one or two colors so the arrangement still feels connected.
Start With Consistent Spacing
For many gallery walls, roughly 2–3 inches between neighboring frames is a practical starting point. Smaller frames can tolerate tighter spacing, while large frames may need a little more breathing room. The exact number is less important than making the gaps look deliberate and reasonably consistent throughout the arrangement.
Pro Tip: Measure the gap between frame edges, not between the artwork inside the frames. Mats and frame moulding can make equal-looking artwork sizes produce very different outside dimensions.
Test The Arrangement At Full Size
Lay the frames on the floor first and adjust them until the overall composition looks balanced. Take a reference photo once you like the arrangement.
Then trace each frame onto kraft paper or another inexpensive paper and cut out a full-size template. Mark the exact location of the frame’s hook, wire, D-rings, or other hanging point on its template. Tape the templates to the wall so you can judge the arrangement from across the room before making permanent holes.
This step is more accurate than simply marking the center of each frame because the distance from the top of the frame to its actual hanging hardware often differs from one frame to another.
How To Hang The Gallery Wall
1. Confirm The Final Layout
Stand at the bedroom doorway, beside the bed, and at any other common viewing position. Check that the gallery feels connected to the furniture rather than floating independently on the wall.
2. Check Every Frame’s Weight And Hanger
Know approximately how much each frame weighs and inspect its existing hanging hardware. A lightweight print in a small frame does not require the same support as a large glazed frame or mirror.
3. Match The Hardware To The Wall
Use picture hooks, screws, anchors, studs, masonry hardware, or removable hanging systems only where they are appropriate for the wall material and the load. Follow the hardware manufacturer’s installation directions and rated weight limits rather than assuming all hooks or adhesive strips perform the same way.
For removable adhesive systems, surface type, wall preparation, curing time, frame dimensions, and maximum weight all matter. Textured surfaces, wallpaper, weak paint, and other delicate finishes may be unsuitable even when the frame itself is light.
Warning: Use extra caution with artwork above a bed or anywhere a falling frame could strike someone. Do not exceed the rated capacity of any hanging product. Some removable picture-hanging systems specifically warn against use over beds, so use mechanically secure hardware appropriate to the frame, hanger, and wall when necessary.
4. Transfer The Hanging Points
With the templates still on the wall, check the spacing and level one last time. Install the selected hanger at the marked attachment point for each frame rather than estimating from the frame’s center.
5. Hang From The Center Outward
For a symmetrical or anchor-piece arrangement, start with the visual center or largest focal piece. For a grid, start with a well-measured reference row or corner. Recheck level and spacing as you add each frame so a small measuring error does not multiply across the wall.
6. Make The Final Alignment
Step back after every few frames. A small level can correct rotation, while removable frame bumpers on the lower corners can help keep some frames straight and prevent hard edges from rubbing the wall.
Protect Photos And Artwork While They Are Displayed
Strong light can fade photographs, prints, watercolors, and other paper-based artwork over time. If a piece is valuable or irreplaceable, avoid placing it where strong direct sunlight repeatedly hits the surface.
For framed photographs, the image surface should not rest directly against the glazing. A suitable mat or spacer keeps the photograph separated from the glass or acrylic. For particularly valuable originals, consider displaying a high-quality reproduction while storing the original under more controlled conditions.
Note: UV-filtering glazing can reduce part of the exposure risk, but it does not make light-sensitive artwork immune to fading. Visible light can also contribute to deterioration.
Troubleshooting Common Gallery Wall Problems
The Layout Looks Scattered
Reduce overly large gaps, strengthen the outer shape of the grouping, or use one larger anchor piece to give the eye a clear starting point. Repeating a frame finish or mat color can also connect mismatched pieces.
The Frames Keep Looking Crooked
Check the hanger hardware rather than repeatedly moving the nail. A loose wire, off-center D-ring, or single attachment point can allow a frame to rotate. Verify the frame itself is square and consider small non-damaging bumpers at the lower corners.
The Gallery Feels Too High Or Too Low
Judge the complete arrangement in relation to the bed, dresser, or other furniture instead of relying only on a universal eye-level measurement. The gallery should feel visually connected to the furniture without crowding it.
You Already Made A Hole In The Wrong Spot
Do not continue adjusting by trial and error. Return to a full-size paper template, measure the frame’s real hanging point, and confirm the corrected location before making another hole.
Top Picks
The following products are supporting supplies rather than the core of the gallery-wall system. Painter’s tape is useful for temporary layout marking and masking, while kraft paper is useful for templates, wrapping, and surface protection.
|
Category |
Product |
Editorial Fit Score |
|---|---|---|
|
🎯 Best for Sharp Lines & Temporary Marking |
95/100 |
|
|
💼 Best for Templates & Packing |
89/100 |
Selection Criteria
You need tools and materials that make the gallery-wall process reliable and low-risk, so durability, predictable removal, surface compatibility, and practical versatility matter. Products that help mark layouts or protect frames can reduce unnecessary wall damage, scratches, and repeated setup work when used for the jobs they are actually designed to perform.
Ease of use also matters because a beginner benefits from supplies that work across several straightforward tasks. The editorial fit scores above reflect suitability for this gallery-wall workflow rather than laboratory testing, and changing retailer ratings are not part of the score.
ScotchBlue Tape

When you’re planning a gallery wall, painter’s tape can help you mark reference lines, hold lightweight paper templates temporarily, mask trim, or protect suitable surfaces while painting. ScotchBlue Sharp Lines products are designed to help control paint bleed and produce cleaner edges when they are used on compatible surfaces according to the package directions.
For gallery-wall planning, its most useful role is temporary positioning rather than supporting the frames themselves. Test tape in an inconspicuous area first if you are unsure about the wall finish.
What People Say
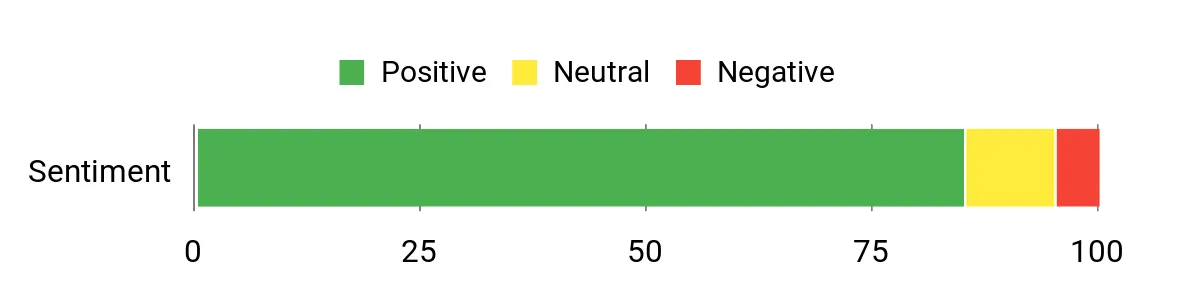
Retailer feedback associated with this product generally favors its sharp paint lines, straightforward removal, and usefulness for more than one masking or marking task. Exact performance can vary with the surface condition, paint, application pressure, temperature, and how long the tape remains in place.
The sentiment chart below is retained from the original article. Because its review sample, collection date, and analysis method are not shown, treat it as directional rather than as a current independent rating.
Original Dataset Sentiment: Positive
|
Pros |
Cons |
|---|---|
|
✅ Designed to help create cleaner paint edges |
❌ Printed branding can be visually noticeable when tape is used as a temporary layout marker |
|
✅ Removable when used within the instructions for the exact product version |
❌ Adhesion and clean removal can vary on difficult, dirty, delicate, or incompatible surfaces |
|
✅ Useful for temporary marking, labeling, and masking |
❌ Not a substitute for rated picture-hanging hardware |
|
✅ Thin profile works well for detail masking |
Long-Term Cost Benefits
Careful masking and layout planning can reduce repaint touch-ups and unnecessary wall repairs. The biggest savings come from using the tape for temporary reference marks and proper masking rather than repeatedly guessing at frame locations or painting freehand beside finished trim.
Return on Investment
A reusable roll can support several small home projects, including layout marking, labeling, and paint preparation. Its value depends on using it on compatible surfaces and removing it according to the exact product instructions.
Situational Benefits
|
Situation |
How It Helps |
|---|---|
|
Painting Around Frames |
It is usually safer and easier to remove a frame before painting. Where masking is appropriate, compatible painter’s tape can help protect adjacent trim, glass, or suitable surfaces when used according to the package instructions. |
|
Transporting Frames |
Short strips can secure protective paper to itself or hold labels in place, but avoid sticking tape directly to delicate artwork or vulnerable frame finishes. |
|
Marking Layouts |
You can temporarily mark reference points or hold lightweight paper templates while checking the gallery-wall layout before installing hardware. |
|
Small Painted Accents |
Its relatively narrow profile can help mask geometric accents and other detailed paint lines on compatible surfaces. |
How To Use
Measure and plan the gallery layout first, then transfer the reference points to full-size paper templates. Apply painter’s tape only to clean, dry, compatible surfaces and press masking edges firmly when painting. If you’re using short pieces to position templates, use only enough tape to hold the lightweight paper in place.
Removal instructions depend on the exact ScotchBlue version. Older 2093EL guidance and newer 2093+ PROSharp guidance do not list the same maximum clean-removal period, so follow the time limit and surface instructions printed on the roll or package you actually have. When removing painter’s tape, pull it slowly back on itself at the angle specified by the manufacturer.
Emotional Benefits
A temporary layout makes the project less stressful because you can adjust the composition before committing to permanent holes. That extra planning gives you more confidence when you start installing the frames.
Versatility
The tape can support masking, labeling, and temporary layout marking, but surface compatibility varies by exact product. Do not assume every ScotchBlue variant is suitable for every painted wall, wood finish, lacquer, masonry surface, or outdoor condition.
Aesthetic Appeal
For painting projects, controlled masking can help produce sharper transitions and protect nearby finishes. For gallery-wall planning, the bright tape is easy to see while you evaluate reference lines and paper templates before installation.
Customization Options
|
Feature |
Practical Flexibility |
|---|---|
|
Width (.94 in) |
Low — the listed roll has a fixed width |
|
Roll Length (60 yd) |
Moderate — you can cut short tabs or long masking runs as needed |
|
Surface Adhesion |
Surface-dependent — follow the exact product’s compatibility guidance |
|
Visibility/Color |
Moderate — the blue color is easy to see during temporary layout work |
Key Benefits
- Useful for sharp paint masking when applied correctly
- Easy to see when marking temporary gallery-wall reference points
- Can hold lightweight paper templates temporarily
- Useful for labeling and general paint-preparation tasks
Retailer rating snapshot: about 4.7/5. Ratings and review counts change over time, so treat marketplace figures as a current shopping signal rather than a permanent product specification.
Scotch Postal Paper

When you’re planning a gallery wall or preparing frames for a move, this kraft paper can serve as a useful template, surface-protection, wrapping, or void-fill material. The manufacturer identifies the roll as 30 inches by 30 feet and describes it as 60 lb kraft paper suitable for mailing, moving, storage, void fill, and creative projects.
For gallery-wall planning, one of its best uses is making full-size frame templates. For packing, treat the paper as one protective layer rather than complete impact protection for fragile glass or valuable artwork.
What People Say
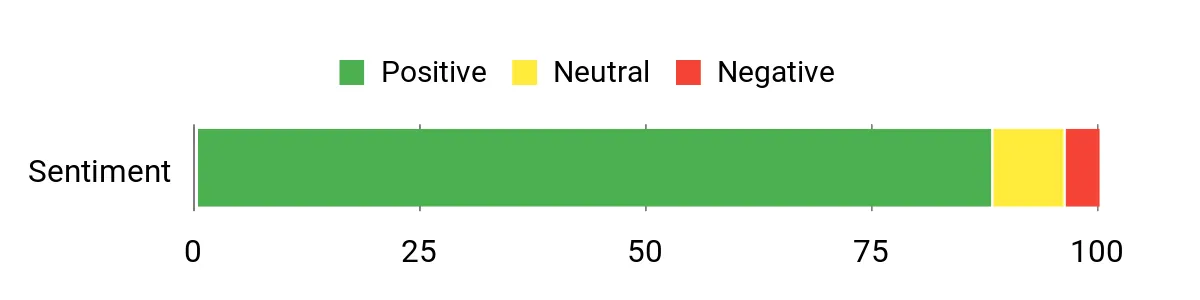
Retailer feedback often emphasizes the paper’s heavier feel compared with ordinary gift wrap and its usefulness for shipping, storage, and craft projects. The roll format also lets you cut custom-size templates for frames.
The original article’s sentiment chart is retained below. Because its underlying sample and collection date are not provided, it should be treated as directional rather than as a current independent consumer-research study.
Original Dataset Sentiment: Positive
|
Pros |
Cons |
|---|---|
|
✅ 60 lb kraft paper has a sturdier feel than ordinary gift wrap |
❌ Rolled paper can curl while you’re laying out templates |
|
✅ Useful as wrapping, surface protection, or package void fill |
❌ Thick paper can cause paper cuts if handled carelessly |
|
✅ Neutral kraft appearance works for crafts and full-size wall templates |
❌ Paper alone does not provide waterproof or complete impact protection |
|
✅ Roll format is easy to cut to custom frame sizes |
Long-Term Cost Benefits
A single roll can serve several jobs: full-size gallery-wall templates, general wrapping, void fill, temporary surface protection, and crafts. Leftover paper can be saved for later layout changes or packing projects.
Return On Investment
The paper’s value comes from its multiuse format rather than from replacing specialized protective packaging. For fragile framed art, glass, or valuable pieces, combine the paper with suitable corner protection, cushioning, separators, and a rigid container instead of relying on kraft paper alone.
Situational Benefits
|
Situation |
How It Helps |
|---|---|
|
Wrapping Frames |
Use it as a surface-protection layer around a frame, then add appropriate corner and impact protection for fragile pieces before transport. |
|
Storage Protection |
It can provide a sacrificial outer paper layer against dust and light rubbing during short-term handling or storage. |
|
Crafting Backings |
You can cut flat sections for mockups, practice pieces, labels, or full-size frame templates. |
|
Presentation Styling |
The neutral brown kraft finish can also be used for simple rustic wrapping and craft projects. |
How To Use
For gallery-wall templates, lay the paper on a flat surface, place the frame on top, trace the outside edge, and cut the template to size. Mark the frame’s actual hanging point on the paper before taping the template to the wall.
For wrapping, cut a sheet large enough to cover the frame and secure the paper around the outside. Add separate impact cushioning and corner protection when transporting fragile frames, and do not place heavy objects on top of glazed artwork.
Use a straightedge when you need clean template edges. If the paper curls from the roll, flatten it before tracing so the template matches the frame dimensions accurately.
Emotional Benefits
Full-size paper templates remove much of the guesswork from layout planning because you can see the complete arrangement before committing to hardware or holes.
Versatility
This roll can work for layout templates, packing, seasonal storage, void fill, rustic wrapping, and general craft projects, making it more useful than a material purchased for only one small task.
Aesthetic Appeal
The natural kraft tone makes temporary templates easy to distinguish from the wall and also suits simple neutral or rustic wrapping projects.
Customization Options
|
Feature |
Customization Level |
|---|---|
|
Sheet Size |
High — cut sections to match individual frames or projects |
|
Basis Weight (60 lb) |
Low — the paper weight is fixed for this product |
|
Finish (Uncoated Kraft) |
Moderate — suitable for writing, marking, wrapping, and many craft uses |
|
Cutting/Scoring |
High — cut templates or wrapping pieces to the dimensions you need |
Key Benefits
- 60 lb kraft paper is substantial enough for reusable layout templates
- 30-inch by 30-foot roll provides material for multiple frames or projects
- Made for wrapping, moving, storage, void fill, and creative uses
- Easy to cut to custom dimensions
Retailer rating snapshot: about 4.8/5. Ratings and review totals change over time and should not be treated as fixed product specifications.
Frequently Asked Questions
Will hanging a gallery wall damage my walls?
Any permanent fastener can leave a hole, but careful planning can keep the number of holes to a minimum. Test the layout with full-size paper templates first, then choose hanging hardware that matches the wall type, frame weight, and manufacturer’s rated capacity. Small nail or screw holes can generally be repaired later, while removable systems should be used only on approved surfaces and according to their instructions.
How do I choose frame sizes and layouts?
Choose the overall layout first. Matching frames work well for a grid, while mixed sizes suit an anchor-piece or salon arrangement. Lay every frame on the floor and judge the group as one shape. Keep the spacing consistent and repeat at least one element—such as frame color, mat color, or artwork palette—to make mixed pieces feel related.
How much space should I leave between gallery-wall frames?
About 2–3 inches is a practical starting point for many arrangements. Small frames can look good with tighter gaps, while larger pieces can support slightly more space. Consistency matters more than following one exact number, so judge the complete wall from normal viewing distance before installing the frames.
Can I use removable strips for a gallery wall above my bed?
Do not assume removable strips are appropriate above a bed. Some picture-hanging strip instructions specifically warn against over-bed use. Where a falling frame could strike someone, use a securely installed hanging method appropriate to the wall, frame weight, and frame hardware, and follow the hardware manufacturer’s instructions and load limits.
How do I protect frames during painting and moving?
Remove frames from the wall before painting whenever practical. If you must mask nearby areas, use painter’s tape only on compatible surfaces and follow the package instructions. For moving, use kraft paper as an outer wrapping or surface-protection layer, then add suitable corner and impact protection for fragile frames. Do not rely on kraft paper alone to protect glass from impact.
How can I protect photographs and prints from fading?
Limit strong direct light on photographs and paper artwork, especially for valuable or irreplaceable originals. Use appropriate mats or spacers so photographs do not rest directly against the glazing. UV-filtering glazing can reduce part of the exposure risk, but it does not eliminate damage from visible light over time.
Customer Preferences
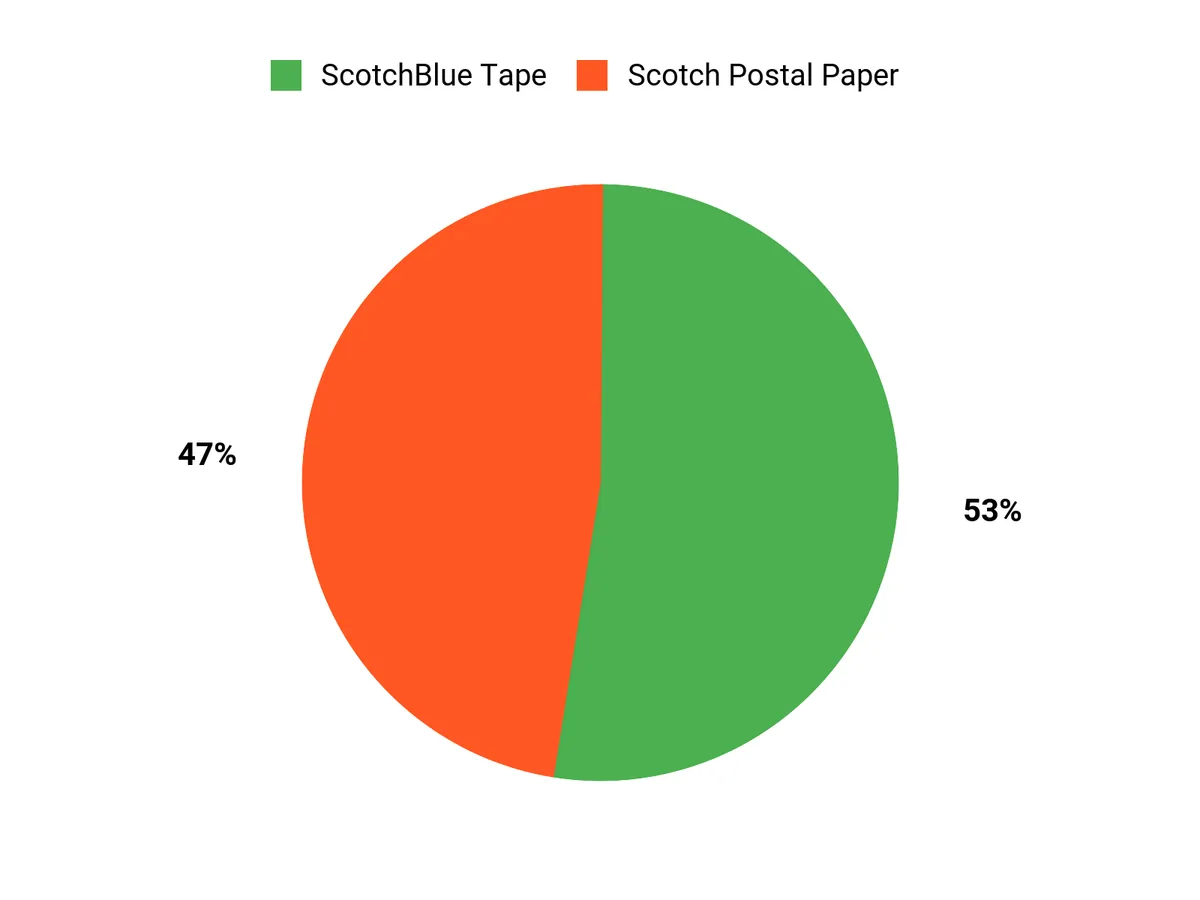
If you are choosing between the two supporting supplies in this article, decide what job you actually need to perform. ScotchBlue painter’s tape is the more relevant choice for temporary layout marks and paint masking on compatible surfaces. Scotch Postal Paper is more useful when you need full-size frame templates, general wrapping, or package void fill.
The original customer-preferences graphic is retained below. Because its sample, date, and methodology are not supplied, treat it as an illustration of the original article’s preference analysis rather than a current independent consumer survey.
Wrapping Up
A successful bedroom gallery wall depends much more on planning and secure installation than on any individual supply. Choose the layout, measure the complete footprint, arrange your frames on the floor, and test full-size paper templates before making holes. Keep the spacing intentional and install each piece with hardware suited to its weight, hanger, and wall type.
Painter’s tape can make temporary marking and paint preparation easier, while kraft paper is especially useful for full-size templates and as one layer of packing protection. For valuable photographs and paper artwork, also think about light exposure, framing materials, and keeping the image surface separated from the glazing.
| ScotchBlue Sharp Lines Multi-Surface Painter’s Tape | Scotch Postal Wrapping Paper | |
|---|---|---|
|
|
|
|
| Retailer Rating Snapshot | About 4.7/5; marketplace ratings and counts change over time | About 4.8/5; marketplace ratings and counts change over time |
| Material | Crepe-paper painter’s tape | Kraft paper |
| Dimensions | 0.94 inches × 60 yards for the listed roll | 30 inches × 30 feet |
| Key Highlights |
|
|
| Shop Now | Shop Now |
This Roundup is reader-supported. When you click through qualifying retailer links, we may earn a referral commission on qualifying purchases.
Sources
- 3M — ScotchBlue painter’s tape product guidance — manufacturer specifications, surface guidance, application, removal, and current PROSharp information.
- 3M University — ScotchBlue Painter’s Tape Product Sheet — legacy 2093EL specifications and clean-removal guidance.
- Scotch Brand / 3M — Scotch Postal Wrapping Paper — manufacturer dimensions, material, recycled-paper information, and intended packing uses.
- 3M Command — Picture Hanging Strips guidance — surface requirements, rated loads, frame-size limits, installation instructions, and safety limitations.
- Library of Congress Preservation — Collections Care — guidance on light damage, photographs, matting, framing, and keeping photographs separated from glazing.
- Federal Trade Commission — Endorsement Guides — guidance on clear and conspicuous affiliate disclosures near endorsements and affiliate links.