A faux leather-wrapped vase is an approachable DIY project that can give a plain glass, ceramic, or similarly smooth vase a warmer, more tailored look. The cleanest results come from measuring carefully, making a template when the vase is curved, cutting with sharp fabric shears, and choosing either an adhesive seam or a removable laced sleeve.
This guide walks you through the complete process while also comparing the shears, faux leather, and awl featured in the original project. The goal is a neat finish without requiring advanced leatherworking skills.
Affiliate disclosure: This article contains Amazon affiliate links. If you make a qualifying purchase through one of these links, we may earn a referral commission at no additional cost to you.
Quick Answer
To make a faux leather-wrapped vase, measure the vase, create a paper template if it curves, cut the faux leather, and dry-fit it before fastening the seam. You can bond the wrap with a compatible adhesive or punch evenly spaced holes and lace the edges together for a removable sleeve.
Key Takeaways
- Measure and dry-fit before cutting the final seam or applying adhesive.
- Use a paper template for tapered, rounded, or irregular vases instead of relying only on circumference measurements.
- Sharp fabric shears make cleaner edges, while an awl is useful only if you plan to lace, stitch, rivet, or add other fasteners.
- Choose an adhesive that is compatible with both the faux leather and the vase surface, and follow its label and curing instructions.
- For fresh flowers, keep water inside a watertight vase or insert rather than exposing the faux leather or bonded seam directly to standing water.
At a Glance
| Time Required | About 45–90 minutes of hands-on work, plus any adhesive drying or curing time specified on the product label |
| Difficulty | Beginner to intermediate |
| Tools Needed | Measuring tape, ruler, paper template, marking tool, sharp fabric shears, cutting mat or cardboard, and optionally an awl plus cord or thread |
| Cost | Low to moderate; the total depends mainly on whether you already own cutting tools and which faux leather, adhesive, and vase you choose |
Top Picks
Note: The scores below are editorial project-fit scores based on cutting control, suitability for this project, ease of use, versatility, and practical limitations. They are not laboratory test results. Amazon ratings, review totals, prices, colors, and availability can change after publication.
|
Category |
Product |
Project-Fit Score |
|---|---|---|
|
✂️ Best Cutting Precision |
93/100 |
|
|
💺 Best For Upholstery Material |
89/100 |
|
|
🪡 Best For Stitching Prep |
86/100 |
Selection Criteria
The products were evaluated for how well they fit a faux leather-wrapped vase project rather than for general popularity alone. Cutting tools need to create a clean edge without forcing you to make repeated passes. The faux leather needs enough flexibility to follow the vase while still looking substantial, and an awl needs to create controlled holes when you choose a stitched or laced seam.
Ease of handling, durability, versatility, price, product specifications, and recurring customer feedback also matter. Because marketplace ratings and review totals change, they should be treated as snapshots rather than fixed specifications.
How to Make a Faux Leather-Wrapped Vase
What You Need
- A clean vase or watertight vase insert
- Faux leather large enough to wrap the vase
- Flexible measuring tape
- Ruler or straightedge
- Paper, kraft paper, or lightweight cardboard for a template
- Pencil, tailor’s chalk, or another removable marking tool
- Sharp fabric shears
- Cutting mat or thick scrap cardboard
- Clips or low-tack tape for dry fitting
- A compatible adhesive, or an awl plus cord/thread for a removable laced sleeve
- Optional blunt large-eye needle for lacing
Warning: Fabric shears and awls can cause cuts or punctures. Keep your free hand out of the cutting or piercing path and place thick cardboard or a cutting mat under the material before using an awl. If you use contact cement or another solvent-based adhesive, read its label and safety data, provide the ventilation it requires, and keep flammable products away from flames, sparks, and other ignition sources.
Step 1: Clean and Inspect the Vase
Wash or wipe the vase so the exterior is free of dust, oil, labels, and loose residue. Let it dry fully. A straight-sided cylinder is the easiest shape for a first attempt because a rectangular wrap can fit it with very little shaping.
If the vase tapers, bulges, or narrows around the shoulder, do not assume one circumference measurement will produce a good fit. Make a paper template first.
Step 2: Measure the Vase
For a cylindrical vase, measure the height you want to cover and the circumference at the wrapping area. Add enough width for your planned seam. About 1–2 cm can work for a simple overlap, while a stitched or laced sleeve needs enough edge material to punch holes without placing them too close to the cut edge.
For a curved vase, wrap paper around the vase, smooth it into position, mark the overlap and top and bottom edges, then remove and flatten the paper. Use that paper as the cutting template.
Pro Tip: Make the paper template fit before cutting the faux leather. Paper is much cheaper to recut, and the template helps reveal where a tapered vase needs a curved edge, small dart, or different seam position.
Step 3: Mark and Cut the Faux Leather
Place the faux leather face down on a protected flat surface. Trace the template on the backing or transfer the measured rectangle with a ruler. Use sharp fabric shears and steady cuts to avoid a choppy edge.
If you are trimming a tight curve, shorter controlled cuts give you more control. Do not cut relief notches until you have dry-fitted the material and confirmed where excess material is actually bunching.
Step 4: Dry-Fit the Wrap
Wrap the cut piece around the vase without adhesive. Hold it temporarily with clips or low-tack tape. Check that the top and bottom edges sit where you want them and that the seam closes without excessive pulling.
Mark the final seam position on the backing. If the material wrinkles badly, return to the paper template and adjust it rather than trying to force the faux leather into shape.
Step 5A: Make a Bonded Wrap
If you want the faux leather attached to the vase, choose an adhesive that its manufacturer recommends for the surfaces you are joining. Faux leather may be PU or another synthetic construction, while the vase may be glass, ceramic, metal, or another material, so one glue is not automatically suitable for every combination.
A consumer leather/craft adhesive can be appropriate for light decorative work when its instructions permit the materials involved. For example, Aleene’s Leather & Suede Glue is described by its manufacturer as forming a clear, flexible bond and recommends testing first. If you choose contact cement, follow the manufacturer’s application, ventilation, open-time, and fire-safety directions instead of applying it like ordinary craft glue.
Apply only the amount required by the adhesive directions. Align the wrap carefully, work progressively around the vase, and smooth the material as you go. Close the final seam and hold or clamp it only in a way permitted by the adhesive instructions.
Step 5B: Make a Removable Laced Sleeve
A removable sleeve avoids permanently bonding material to the vase. Dry-fit the faux leather with its two vertical edges meeting or nearly meeting. Mark matching hole positions along both edges using a ruler so the spacing remains consistent.
Place the material over thick cardboard or a cutting mat. Use the awl to pierce each marked point, keeping your fingers away from the tip’s exit path. Test the first few holes on scrap faux leather before punching the final sleeve.
Thread cord through the paired holes in a simple cross-lace or straight stitch pattern. Keep the tension firm enough to close the seam but not so tight that the edges curl or buckle. Knot the cord securely, trim the excess, and slide the completed sleeve over the vase.
Step 6: Finish the Edges and Let the Adhesive Cure
Trim stray fibers or uneven corners with the shears. If you used adhesive, leave the wrap undisturbed for the drying or curing period stated by its manufacturer. Do not fill or wash the vase in a way that exposes an uncured seam to moisture.
For a stitched sleeve, make sure knots, rivets, or lacing ends cannot scratch furniture. A small felt pad under the vase can protect delicate surfaces.
Step 7: Add Flowers or Display the Vase
If the underlying vase is watertight, fill that inner vessel normally while keeping spills off the faux leather. If you wrapped a decorative container that is not watertight, place a glass or plastic vase insert inside before adding fresh flowers and water.
JINJIAN Shears

These 9-inch shears are listed with high-carbon-steel blades, a rubber handle, a matte finish, and a right-handed configuration. Their substantial construction suits the main job required here: producing a cleaner edge through fabric and thin craft upholstery material without repeatedly sawing at the same line.
For a faux leather vase, the useful feature is not simply blade size but control. A clean edge sits flatter at the seam and requires less corrective trimming. Their roughly 9.92-ounce listed weight can feel reassuringly solid, although that same weight may be less comfortable during long cutting sessions.
What People Say
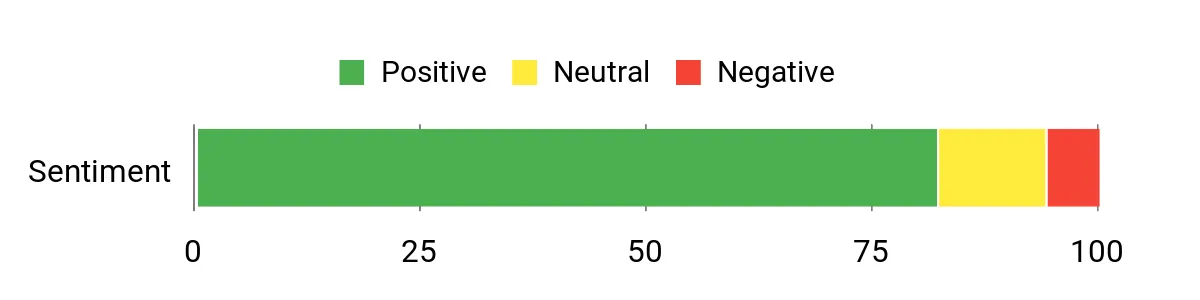
The review summary supplied with the original article emphasizes sharpness, solid construction, and versatility beyond ordinary sewing. It also identifies two practical limitations: the right-handed design and the relatively substantial weight.
Because customer ratings and totals change across marketplace listings, the review chart below should be read as a snapshot of the review analysis used when the article was prepared rather than a live Amazon rating.
Overall Sentiment: Positive in the supplied review analysis
|
Pros |
Cons |
|---|---|
|
✅ Sharp blades suited to precise trimming |
❌ Right-handed orientation limits suitability for left-handed crafters |
|
✅ Substantial construction can help with controlled cutting |
❌ Heavier than lightweight craft scissors, which may matter during long sessions |
|
✅ Curved professional-style profile works for varied craft cuts |
Long-Term Cost Benefits
High-carbon-steel shears can provide long service when they are kept clean, dry, properly adjusted, and sharp. The practical saving comes from having one reusable cutting tool for multiple fabric and craft projects rather than buying project-specific disposable cutters. Actual service life depends on use and maintenance.
Return on Investment
The main value is better cutting control and reduced material waste. A clean first cut can save time because you spend less effort correcting ragged edges before gluing or lacing the wrap. The benefit grows if you also use the shears for sewing, upholstery, paper, or other household craft jobs.
Using It In Your Project
Transfer your paper template or measurements to the backing of the faux leather, then cut along the marked line. Keep the material flat and supported. When following a curve, use short controlled cuts and rotate the material rather than twisting your wrist aggressively.
Dry-fit the panel before removing any additional material. If you plan to stitch or lace the sleeve, make the final cut first and use the awl only after confirming the seam edges align correctly.
Versatility
The listed blade material and size make these shears useful for fabric, faux leather, heavier craft paper, and similar DIY materials. Keep a dedicated fabric pair away from abrasive cutting jobs when preserving the sharpest possible fabric edge matters.
Aesthetic Appeal
The matte metal finish and black rubber handle have a straightforward workshop look, but the tool’s real aesthetic contribution is the edge it produces. Straight, clean cuts make an exposed seam or top edge look more intentional.
Customization Options
|
Feature |
Project-Relevant Detail |
|---|---|
|
Blade Precision |
High project importance |
|
Handle Grip |
Rubber-handled design |
|
Hand Orientation |
Right-handed |
|
Cut Length (9 inch) |
Useful for long straight craft cuts |
Problem Solving
Sharp shears address one of the most visible problems in this project: a rough or stepped cut line. A clean edge is easier to align, easier to glue, and less likely to require repeated trimming that changes the panel dimensions.
Expertise Level
Beginner to Advanced. Beginners should work slowly and keep their non-cutting hand outside the path of the blades.
Key Benefits
- High-carbon-steel blades listed for fabric and leather cutting
- Substantial construction for controlled trimming
- 9-inch format for both straight and curved craft cuts
- Reusable across many fabric and upholstery-style projects
Rating snapshot: The original article recorded 4.6/5 from 1,415+ ratings. Marketplace totals change, so check the current Amazon listing for today’s rating and review count.
DAFUN Faux Leather

The linked DAFUN listing describes a pre-cut 18-by-54-inch PU faux leather panel approximately 1.2 mm thick. That makes it substantial enough to look like an upholstery material while remaining practical for cutting and decorative wrapping.
The listing markets the face as waterproof and easy to clean. For this project, however, it is still best to treat the wrap as decorative: keep standing water inside the vase or a separate watertight insert and wipe spills rather than soaking the material or seam.
What People Say
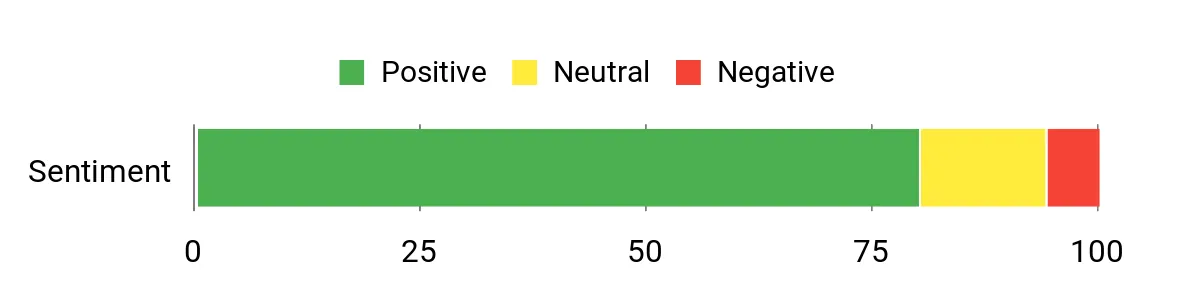
The supplied review summary highlights appearance, handling, and durability as common positives. Some buyers also report an initial manufactured-material odor and slight variation between colors or batches. Those comments are useful when planning a decor project where shade matching matters.
As with all marketplace review summaries, individual experiences vary and the rating total changes over time.
Overall Sentiment: Positive in the supplied review analysis
|
Pros |
Cons |
|---|---|
|
✅ Pre-cut sheet is convenient for small upholstery and decor projects |
❌ Some customer feedback mentions an initial manufactured-material odor |
|
✅ 1.2 mm listed thickness balances structure with workable flexibility |
❌ Color can vary slightly by listing, display, or production batch |
|
✅ PU surface is marketed as wipe-clean and water resistant |
Long-Term Savings
A reusable faux leather panel can be economical for small projects because offcuts may be used for coasters, handles, labels, book covers, or other decor. How long a finished wrap lasts depends on sun exposure, abrasion, adhesive choice, and how frequently the vase is handled.
Return on Investment
The main practical value is obtaining a leather-like decorative finish without needing to cut a natural hide. A pre-cut panel also simplifies material planning for a small project, although you should still make a paper template before cutting the final piece.
DIY Guide
Measure the vase or create a paper template, then transfer that shape to the backing of the faux leather. For a straight overlap seam, allow approximately 1–2 cm of extra width and dry-fit it before deciding exactly where to trim.
If the vase changes diameter sharply, adjust the paper pattern rather than relying on random relief cuts. Where a small notch or dart is genuinely needed, make it only after testing the location on the template.
For a bonded wrap, test your chosen adhesive on scrap faux leather and an inconspicuous portion of the vase or a matching test surface. Follow the adhesive manufacturer’s directions for surface preparation, open time, pressure, and curing.
Versatility
Faux leather of this type can work for decorative wraps, light upholstery crafts, book covers, bags, panels, and similar indoor DIY projects. Its 1.2 mm listed thickness may be too bulky for projects designed around thin apparel fabric, so match the material to the intended use.
Aesthetic Appeal
The distressed bark-style finish gives the material a warm, aged-leather appearance that can suit rustic, industrial, farmhouse, or vintage-inspired decor. On a vase, careful edge alignment matters more than decorative complexity: a clean seam makes the wrap look deliberate.
Customization Options
|
Feature |
Customization Level |
|---|---|
|
Color Choices |
Varies by current seller listing |
|
Cut Size |
High — material can be trimmed to your template |
|
Finish Texture |
Fixed for the selected distressed-bark variant |
|
Bonding Method |
High — adhesive, lacing, stitching, or suitable fasteners can be considered |
Problem Solving
A flexible upholstery-style sheet makes it easier to create a consistent decorative surface than trying to assemble many small scraps. The backing also provides a surface on which you can mark a template. For difficult vase shapes, the solution to puckering is usually a better pattern rather than simply stretching the material harder.
Expertise Level
Beginner to Intermediate. Straight cylindrical vases are easiest; tapered or bulb-shaped vases require more careful pattern making.
Key Benefits
- Listed 1.2 mm PU construction
- Pre-cut 18-by-54-inch size for the linked variant
- Distressed decorative appearance
- Can be cut for glued, stitched, or removable vase sleeves
Rating snapshot: The original article recorded 4.5/5 from 966+ ratings. Current accessible marketplace totals differ slightly, so use the linked Amazon page for the latest rating and review count.
WUTA Awl

The linked WUTA set is listed as a three-piece pack of leathercraft awls with wooden handles and stainless-steel points. An accessible product listing gives an overall tool length of about 4.73 inches and describes the awls for piercing leather or fabric for rivets, snaps, eyelets, and similar craft work.
The available listing does not clearly establish that the three supplied awls have three different tip diameters, so this guide treats them as a three-piece set rather than promising three distinct sizes.
What People Say
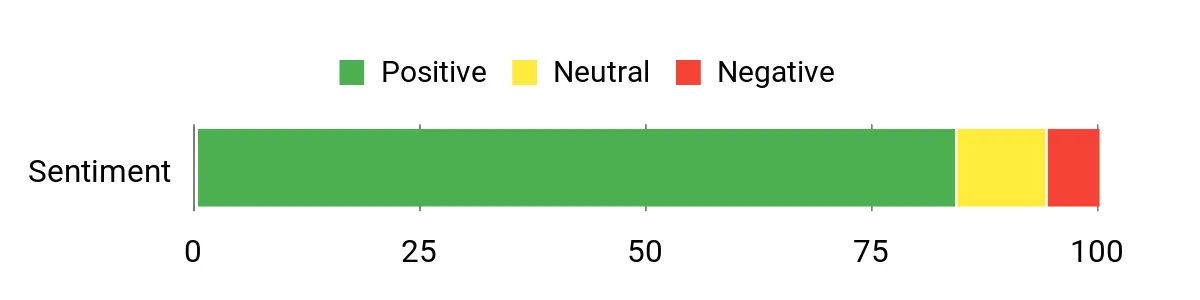
The supplied review summary emphasizes sharp points, simple handling, and usefulness for leathercraft and hole marking. It also notes that storage protection and suitability for continuous heavy-duty work may be limitations.
Marketplace rating totals for this ASIN vary between sources and over time, so the chart represents the review analysis originally supplied with the article rather than a live rating feed.
Overall Sentiment: Positive in the supplied review analysis
|
Pros |
Cons |
|---|---|
|
✅ Three-piece pack provides spares for a craft kit |
❌ Protective storage should be checked so sharp tips are not left exposed |
|
✅ Stainless-steel points are suited to piercing leather and fabric |
❌ Small hand awls are not a substitute for a dedicated punch on repeated heavy production work |
|
✅ Compact wooden handles suit controlled craft work |
Long-Term Savings
A reusable three-piece awl set can cover repeated marking and piercing tasks without consumable punches. Keep the points protected and do not use a damaged or loose-handled tool. The practical benefit is versatility across small leather and fabric projects rather than a guaranteed monetary saving.
Return on Investment
An awl is worthwhile when you plan a laced, stitched, riveted, or snapped seam. It helps place holes before assembly and reduces the temptation to force a sewing needle through thick material. If your vase wrap will be glued with no stitching or fasteners, however, an awl may not be necessary at all.
DIY Guide
Mark the hole positions with a ruler so the two seam edges match. Place the faux leather over thick cardboard or a proper cutting surface, position the awl vertically over the mark, and press through under control.
Keep your supporting hand away from the underside and path of the point. Test the spacing and hole size on an offcut first. For decorative lacing, matching holes on the opposite edge are more important than making the holes unnecessarily large.
Versatility
Awls can be useful for leathercraft, fabric reinforcement, snap or rivet preparation, paper crafts, and marking small pilot locations. Use the tool only for materials and tasks it can pierce safely and controllably.
Aesthetic Appeal
The wooden handles have a traditional workshop appearance, but the visual benefit to the vase is precision. Evenly positioned holes make lacing or visible stitches look deliberate rather than improvised.
Customization Options
|
Feature |
Project-Relevant Detail |
|---|---|
|
Tip Sizes |
Different diameters are not clearly verified for the linked three-piece listing |
|
Handle Grip |
Fixed wooden-handle design |
|
Pack Quantity |
Three tools in the linked listing |
|
Protective Cover |
Listing information describes protection covers; inspect and use them for safe storage |
Problem Solving
The awl helps solve inconsistent stitch placement by letting you mark and pierce matching holes before lacing. This reduces bunching caused by forcing cord through randomly positioned points and helps the two edges meet more evenly.
Expertise Level
Beginner to Advanced, provided basic puncture-tool safety is followed. Beginners should practice on scrap material first.
Key Benefits
- Three-piece craft set
- Stainless-steel points with wooden handles
- Useful for pre-piercing lacing, stitch, rivet, or snap locations
- Compact size for detailed hand work
Rating snapshot: The original article recorded 4.6/5 from 261+ ratings. Current third-party marketplace sources show differing rating totals, so check the linked Amazon listing for today’s figure.
Troubleshooting a Faux Leather Vase Wrap
The Wrap Has Wrinkles or Puckers
Stop before gluing. A curved vase often needs a shaped paper template rather than a simple rectangle. Refit the template, mark where the excess occurs, and transfer the corrected pattern to a fresh section of faux leather.
The Seam Will Not Stay Flat
First confirm that the material is not being stretched too tightly around the vase. For bonded seams, verify that the adhesive is compatible with both surfaces and that you followed its preparation, open-time, pressure, and curing instructions. For laced seams, loosen overly tight cord tension.
The Top or Bottom Edge Looks Uneven
Place the wrap on the vase and mark the final edge while it is in its correct position. Remove it before trimming. A ruler works for straight cylinders; a paper pattern is better for curved profiles.
Adhesive Is Showing at the Seam
Do not automatically wipe wet adhesive across the faux leather face, because that can spread the mark. Follow the adhesive manufacturer’s cleanup directions. Prevention is easier: use only the recommended quantity and practice on scrap first.
The Material Has a Strong Odor
Some synthetic materials may have an odor when first unpacked. Allow the material to air in an appropriate ventilated area before assembly. If an odor comes from an adhesive, follow its label and safety data rather than relying on general craft advice.
The Awl Is Tearing the Faux Leather
Test on scrap first, support the material firmly, and avoid enlarging the hole more than the lacing requires. Place holes far enough from the cut edge that the remaining material is not easily torn under tension.
Frequently Asked Questions
What materials do I need for a faux leather-wrapped vase?
You need a vase, faux leather, measuring tape, a ruler, paper for a template, a marking tool, sharp fabric shears, and a protected cutting surface. For a bonded wrap, add an adhesive compatible with both materials. For a removable stitched or laced sleeve, add an awl, cord or thread, and optionally a blunt large-eye needle.
How do I cut and fit faux leather around a vase?
Measure the height and circumference of a straight vase, or make a paper template for a tapered or curved vase. Transfer the pattern to the back of the faux leather, cut it with sharp shears, and dry-fit it before applying adhesive or punching holes. Allow enough material for the seam you plan to use.
What adhesive should I use on faux leather?
Use an adhesive whose manufacturer lists your faux leather or similar synthetic material and the vase surface as compatible. Test it on scrap first. Consumer leather or craft adhesives may be convenient for light decorative work, while some contact cements are stronger but may be solvent-based and flammable. Always follow the product’s label, ventilation requirements, and cure time.
Can I use hot glue on faux leather?
Sometimes, but do not assume every faux leather reacts the same way. Some documented vase projects use hot glue successfully. Material thickness, backing, glue temperature, and construction vary, so test the glue on an offcut first and use a different adhesive if it distorts, stains, hardens, or damages the material.
Will faux leather hold up, and how should I care for the finished vase?
A 1.2 mm upholstery-style PU sheet can work well for decorative indoor use, but longevity depends on abrasion, sunlight, moisture, and the seam method. Wipe the surface gently with a damp cloth when appropriate for the material and avoid abrasive cleaning. Keep fresh-flower water inside a watertight vase or insert rather than soaking the wrap.
How do I stop the faux leather from puckering around a curved vase?
Make a fitted paper template first and correct the pattern before cutting the faux leather. Dry-fit the final material and mark exactly where excess develops. Small darts or relief cuts may help some shapes, but they should be planned from the template rather than cut randomly because every notch is permanent.
Customer Preferences
For this project, the most useful products are the ones that improve visible finish and reduce rework. That means sharp, controllable shears for the perimeter; flexible faux leather that can follow the vase without excessive force; and an awl that makes consistent holes when you choose a laced, stitched, snapped, or riveted seam.
Ease of handling also matters. A beginner will usually get a cleaner first result from a straight cylindrical vase and a paper template than from starting with a sharply tapered or bulb-shaped vessel.
Wrapping Up
A polished faux leather-wrapped vase depends more on measuring and fitting than on complicated leatherworking. Start with a paper template, cut the faux leather cleanly, test the fit, and then choose the construction method that matches the look you want. Adhesive creates a simpler bonded wrap, while punched holes and lacing can produce a removable decorative sleeve.
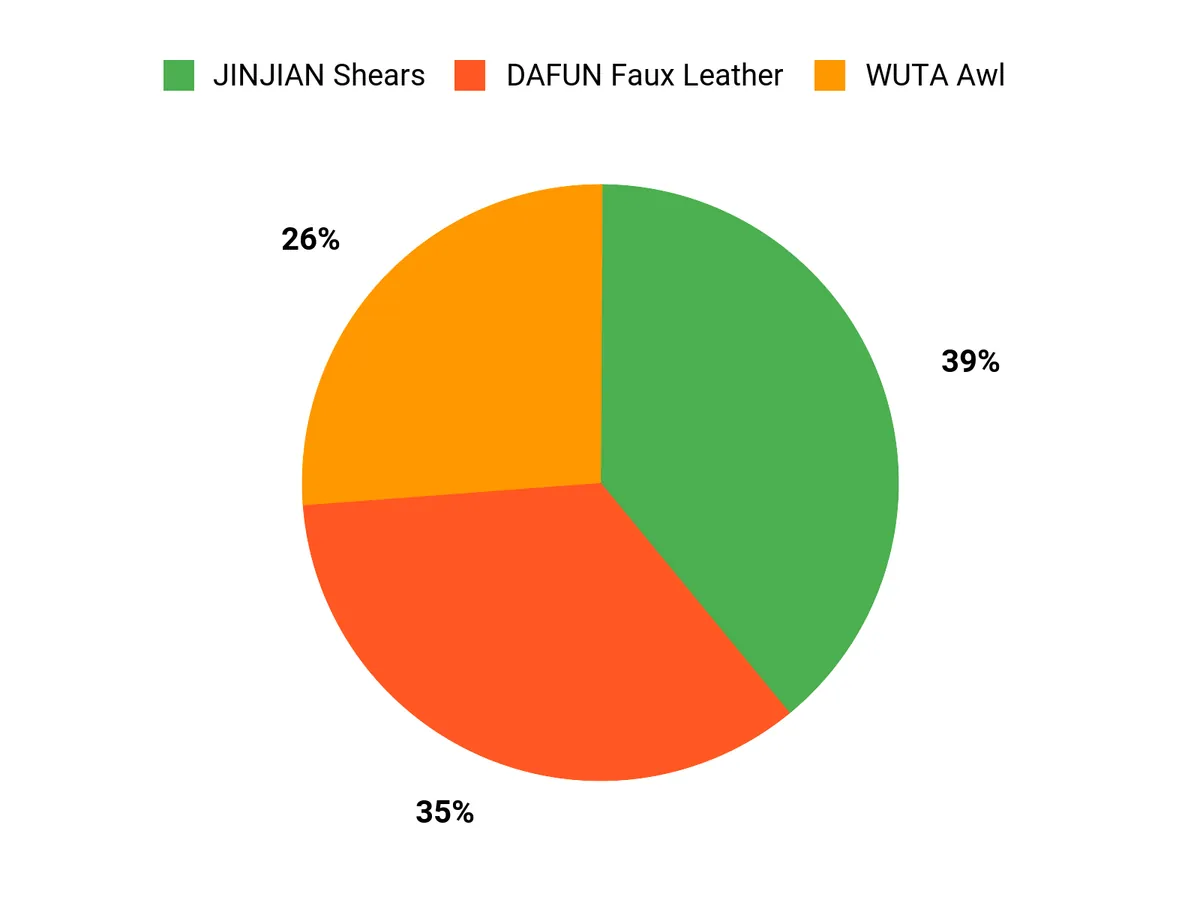
The JINJIAN shears suit the cutting stage, the DAFUN PU faux leather provides the decorative surface, and the WUTA awl becomes useful when your design requires holes for lacing or fasteners. Work on a protected surface, handle sharp tools deliberately, follow the exact adhesive manufacturer’s safety instructions, and keep water contained inside the actual vase or a waterproof insert.
| Heavy Duty 9 Inch Fabric Scissors | Premium Faux Leather Upholstery Fabric 1.2mm Thickness | WUTA Leather Craft Awl Tools (3 Packs) | |
|---|---|---|---|
|
|
|
|
|
| Rating | Original article snapshot: 4.6/5 (1,415+); check Amazon for the current total | Original article snapshot: 4.5/5 (966+); check Amazon for the current total | Original article snapshot: 4.6/5 (261+); check Amazon for the current total |
| Material | High-carbon-steel blades | Polyurethane (PU) faux leather | Stainless-steel points with wooden handles |
| Dimensions | 9 inches | 18 x 54 inches for the linked pre-cut variant | Approximately 4.73 inches overall length per tool |
| Weight | Approximately 9.92 ounces | Approximately 1.8 lb (820 g) for the linked 18 x 54-inch listing snapshot | Approximately 1.13 ounces (32 g) total listed item weight |
| Shop Now | Shop Now | Shop Now |
This Roundup is reader-supported. When you click through links we may earn a referral commission on qualifying purchases.
Sources
- U.S. Occupational Safety and Health Administration — Hand and Power Tools — background on hand-tool hazards and safe handling.
- OSHA — Hand and Power Tools publication — guidance on common hand-tool hazards, including safe use of knives and scissors.
- Aleene’s Leather & Suede Glue — manufacturer guidance for a clear, flexible craft adhesive and the recommendation to test before use.
- Tandy Leather — Tanner’s Bond Contact Cement — manufacturer/supplier information on flexible contact cement and flammability precautions.
- 3M Plastic Adhesive 2262 — technical example of an adhesive formulated for vinyl/plastic bonding and why product-specific instructions matter.