
Half-moon clay wall hangings look simple, but clean curves, even thickness, smooth edges, and secure hanging points depend on using the right clay and a few purpose-built tools. The best setup changes depending on whether you use air-dry clay or oven-bake polymer clay.
This guide compares ten useful supplies for shaping, measuring, smoothing, finishing, and displaying half-moon clay pieces. It also adds the missing workflow and safety details you need to turn those supplies into a finished wall hanging.
Quick Answer
For most half-moon clay wall hangings, start with workable clay, a dedicated nonstick surface, a roller that controls thickness, a template or compass, a cutting tool, a hole-making tool, fine abrasive paper, and a compatible finish. Polymer clay also needs package-specific baking, an oven thermometer, and clay-dedicated tools.
Key Takeaways
- DAS is the simplest pick here when you want air-dry clay and no oven curing.
- The Sculpey work mat is designed for polymer-clay work and baking; the current manufacturer limit is not above 550°F (287°C), while your clay still must be baked at the time and temperature printed on its package.
- Make hanging holes while the clay is still workable whenever the design allows; drilling cured clay creates extra breakage and dust risk.
- Keep polymer-clay tools and work surfaces dedicated to clay instead of returning them to food preparation.
- Retailer ratings and review counts in this roundup are snapshots from the source data and can change.
Top Picks
|
Category |
Product |
Score |
|---|---|---|
|
🏆 Best Work Mat |
92/100 |
|
|
🎯 Best Structural Dowel |
90/100 |
|
|
⭐ Best Air-Dry Clay |
95/100 |
|
|
🔰 Best Small Dowels |
85/100 |
|
|
🚀 Best Clay Softener |
88/100 |
|
|
🔎 Best Measuring Set |
78/100 |
|
|
🛠️ Best Sandpaper |
80/100 |
|
|
🔒 Best Varnish |
86/100 |
|
|
🎨 Best Artist Sponges |
82/100 |
|
|
⚖️ Best Rolling Pin |
79/100 |
Note: The 78–95/100 scores are editorial project-fit scores for this specific half-moon-hanging workflow, not lab measurements, safety grades, or manufacturer ratings. Retailer star ratings shown later are separate snapshots and may change.
How We Chose These Supplies
We judged each item by how directly it helps with a real step in the project: shaping, thickness control, cutting or layout, drying or baking, edge cleanup, painting or sealing, and display. We also checked current manufacturer guidance where available. The editorial score reflects project fit, ease of use, versatility, and how much the item solves a common failure point; it is not a substitute for the product label or manufacturer instructions.
For polymer-clay safety and curing, follow the clay package first. Sculpey currently recommends an oven thermometer, good ventilation, oven-safe baking surfaces, no microwave use, and dedicated clay tools/work surfaces. For finishes, follow the finish maker’s application instructions rather than a generic craft technique.
What You Still Need for a Complete Half-Moon Hanging
The ten products below cover many useful jobs, but they do not make a complete kit by themselves. A practical wall-hanging setup also needs a few simple items that were missing from the original roundup.
- Dedicated craft blade or clay knife: for clean edges and trimming templates.
- Skewer, straw, needle tool, or small cutter: for making hanging holes while the clay is still workable.
- Cord, twine, jewelry wire, or jump rings: for joining clay pieces and attaching them to a dowel or hanger.
- Cardstock or paper template: for repeating the same half-moon curve.
- Oven thermometer: essential for polymer clay because the oven dial may not reflect the actual baking-zone temperature.
- Paint and a suitable brush, if desired: for color after the clay has fully dried or cured.
- Wall hardware rated for the finished piece: choose it after you know the final weight and wall type.
How to Make a Half-Moon Clay Wall Hanging
At a Glance
| Time Required | About 45–90 minutes of active work, plus full air-drying or package-specified polymer-clay curing and cooling time |
| Difficulty | Beginner to intermediate |
| Tools Needed | Roller, template or compass, dedicated cutting tool, hole-making tool, abrasive paper, finishing brush; oven thermometer for polymer clay |
| Cost | Varies by clay, finish, and tools already owned; start with only the tools your chosen clay requires |
1. Choose Air-Dry or Polymer Clay
Use air-dry clay when you want a no-oven project and are comfortable waiting for the piece to dry fully before sanding, painting, and assembly. Use polymer clay when you want an oven-cured piece and can follow the exact baking instructions on the clay package.
2. Make a Template and Roll an Even Slab
Draw a circle with a compass or trace a round object, then cut the curve into the half-moon shape you want. Roll the clay on a clean, dedicated surface with even pressure. A thickness-ring roller helps when you are making several matching pieces.
3. Cut the Shape and Make Hanging Holes
Cut around the template with a dedicated craft blade or clay knife. Smooth the edge while the clay is still workable. Make cord, wire, or jump-ring holes before drying or curing whenever possible, and leave enough material around each hole so the edge is not fragile.
Pro Tip: Make one test piece first. Check its hole size, balance, thickness, and finish before cutting an entire batch.
4. Dry or Bake Correctly
For air-dry clay, keep the piece flat and let it dry completely according to the package directions before sanding or sealing. For polymer clay, preheat the oven to the package temperature, verify the baking zone with an oven thermometer, use an oven-safe clay surface, and follow the package time and temperature rather than a generic number.
Warning: Do not microwave polymer clay or exceed its recommended baking temperature or time. Keep clay tools and work surfaces dedicated to clay, use good ventilation, and use a barrier if a baking surface will later return to food use.
5. Sand With Dust Control
After the piece is fully dry or cured and cool, smooth only the areas that need it. Start gently and move to finer abrasives as needed. When sanding polymer clay, collect dust on disposable paper and keep it out of the sink.
6. Paint and Seal
Apply compatible paint only after the clay is ready for finishing. Let paint dry fully before varnishing. For Liquitex BASICS Matte Varnish, the manufacturer recommends horizontal application with a large soft brush, thin coats, and at least three hours between coats; it specifically advises against a sponge brush.
7. Assemble and Hang
Thread cord, wire, or jump rings through the prepared holes and connect the pieces to the chosen dowel or hanging bar. Test balance before putting the piece on the wall. Decorative clay parts are brittle compared with structural hardware, so use wall fasteners suited to the finished weight and wall material.
Note: A clay wall hanging is decorative, not load-bearing. Avoid relying on clay alone to support shelves, plants, or other heavy objects.
Sculpey Mat

This reusable silicone mat solves two common polymer-clay problems at once: it gives you a non-skid work surface and lets you move the project onto a baking sheet without lifting a fragile shape. Sculpey’s current product page lists the mat at 7.75 × 13 inches and says not to use it above 550°F (287°C). Your clay’s package time and temperature still control the actual bake.
For small studios, toaster-oven projects, and repeated batches, the main advantages are cleaner transfers, a steady work surface, and easy soap-and-water cleanup. Keep it dedicated to clay work rather than returning it to food preparation.
What People Say
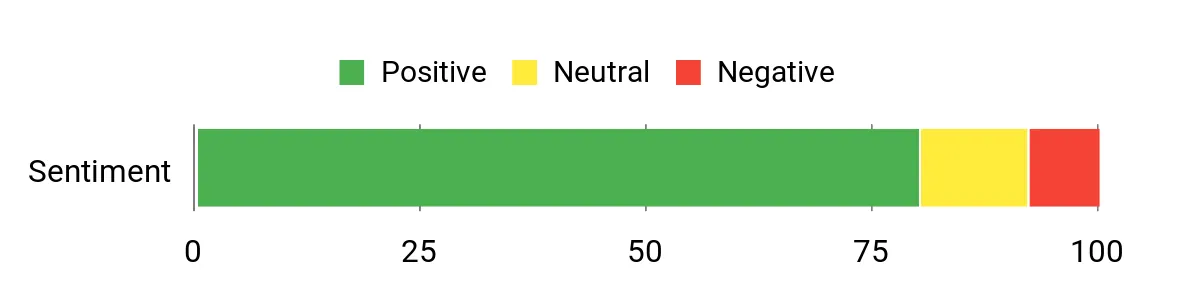
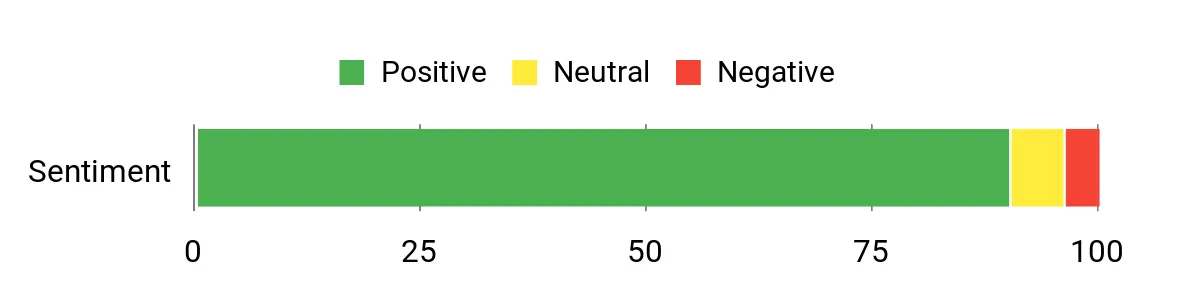
Customers consistently praise how the mat keeps clay from sticking and how easy it is to move projects to the oven. People note the non-slip texture helps when working in awkward positions or at a small table, and many appreciate the compact storage and durability for repeated craft sessions.
Overall Sentiment: Positive
When It Helps Most
|
Situation |
How It Helps |
|---|---|
|
Small workspaces or portable setups |
You can cut the mat to fit a serving tray or lap board so your project stays contained and you avoid mess when crafting away from a dedicated table. |
|
Baking pieces in a toaster oven |
Place the mat on a metal baking pan and slide your items straight from the work surface into the oven, eliminating the need to transfer fragile pieces. |
|
Crafting with kids |
The nonstick, easy-to-clean surface simplifies cleanup and keeps small projects from sticking or getting ruined during handling. |
How To Use
Lay the mat flat on a hard work surface and shape, roll, and trim your clay on it. Sculpey describes the mat as a non-skid silicone work surface; you do not need to rely on an unverified “shiny side down” rule.
For polymer clay, slide the mat onto a baking sheet and cure the clay according to its package directions. Use an oven thermometer and do not exceed either the clay’s recommended temperature or the mat’s 550°F (287°C) maximum.
Environmental Considerations
These are practical waste-reduction considerations, not a full lifecycle assessment of the product.
|
Impact |
Benefit |
|---|---|
|
Reusable Surface |
Reduces reliance on disposable parchment or foil for small batches, cutting single-use waste. |
|
Durable Material |
A long-life mat means fewer replacements over time, lowering the environmental cost of frequent disposables. |
|
Less Cleaner Use |
Easy cleanup with soap and water limits the need for harsh solvents or heavy-duty cleaners. |
Health & Safety Considerations
These points describe workflow and exposure considerations, not medical or therapeutic benefits.
|
Benefit |
Description |
|---|---|
|
Cleaner Workspace |
A nonstick work area keeps stray clay bits contained so you spend less time scraping surfaces and more time crafting. |
|
Reduced Transfer Risk |
Moving pieces on the mat lowers the chance of dropping or crushing fragile items, which keeps you from having to rework projects. |
|
Simpler Cleanup |
Quick soap-and-water cleaning reduces exposure to strong chemical cleaners and dust from scraping dried residues. |
Ease Of Use
|
Feature |
Ease Level |
|---|---|
|
Preparing Surface |
Easy |
|
Transferring To Oven |
Easy |
|
Cleaning |
Easy |
|
Cutting To Size |
Moderate |
Versatility
You can use the mat for polymer clay, air-dry clay, painting, and other small craft tasks. It’s handy for shaping, baking, and protecting surfaces across multiple projects.
Key Benefits
- Nonstick surface that prevents clay from adhering
- Oven-safe design lets you bake without transferring pieces
- Non-skid underside keeps work steady while you shape
- Rollable, cut-to-fit storage for small studios
Retailer rating snapshot: 4.3/5 (about 288+ reviews in the source capture; current figures may differ).
Woodpeckers Dowel

You get clean, straight lengths of birch that make building and mounting half-moon clay hangers feel reliable. These 1-inch square dowels are hefty enough to act as a structural backbone or a polished trim piece, and their unfinished surface takes paint, stain, or glue without fuss.
Use these square dowels as an external display bar, backer, trim piece, or mounting component after the clay is fully cured or dry. For most decorative clay hangings, making holes or channels while the clay is workable is safer and more predictable than forcing a thick wooden insert into a finished piece.
What People Say
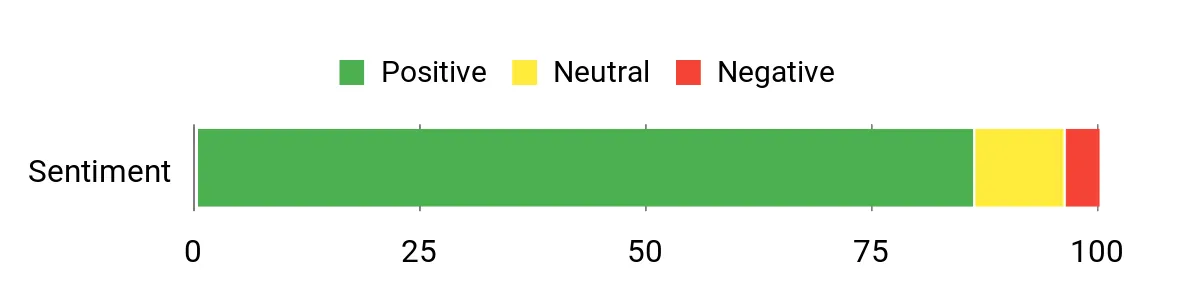
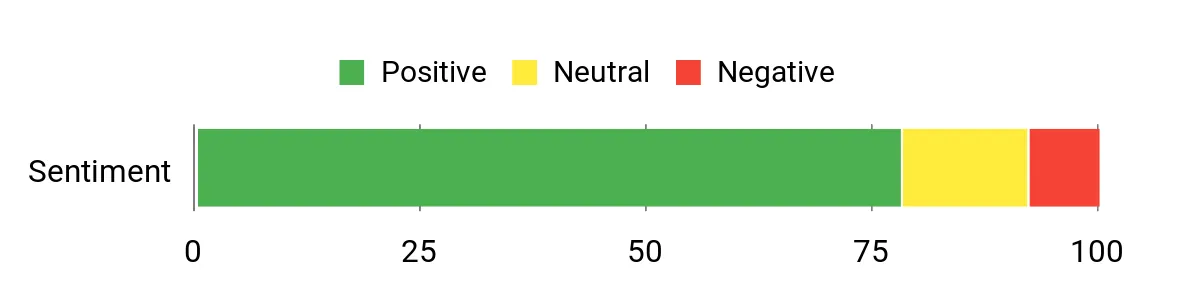
Buyers commonly highlight how straight and true the pieces arrive, which matters when you need accurate supports or clean edges on your hangers. People also point out the good quality of the cuts and the consistent thickness, and many appreciate that the wood accepts finishes easily for a tailored look.
Overall Sentiment: Positive
Use Cases
|
Situation |
How It Helps |
|---|---|
|
Building a hanging bar |
Use the square dowel as a clean, rigid bar that stays straight under weight and hides neatly behind clay pieces. |
|
Creating a backer or external mount |
Attach cured or fully dry clay to a planned wooden backer or hanging bar using a project-appropriate attachment method, rather than forcing a dowel into finished clay. |
|
Adding a decorative trim |
Cut and sand the dowel into shorter lengths to frame or edge your half-moon pieces for a professional finish. |
DIY Tips
Measure and mark the dowel before cutting to keep every piece uniform. Use a fine-tooth saw for clean edges, then sand the ends smooth so they seat flush with clay. For clay wall hangings, use the dowel as an external bar or backer; make clay holes or channels while the clay is workable rather than forcing a thick dowel into a finished piece.
Seal or paint the visible surfaces before final assembly for a neat, durable finish.
Environmental Considerations
These are practical waste-reduction considerations, not a full lifecycle assessment of the product.
|
Impact |
Benefit |
|---|---|
|
Natural Material |
Birch is a renewable wood source and biodegradable at end of life. |
|
Durability |
Long-lasting pieces reduce the need for frequent replacements and waste. |
|
Local Finishing |
You can finish and seal the wood at home using low-VOC products to limit transport of treated materials. |
Health & Safety Considerations
These points describe workflow and exposure considerations, not medical or therapeutic benefits.
|
Benefit |
Description |
|---|---|
|
Low Chemical Exposure |
Unfinished wood avoids the off-gassing associated with pre-treated materials, especially if you choose low-VOC finishes. |
|
Reduced Dust |
Sanding a straight piece creates predictable dust patterns you can manage with a small shop vac or damp cloth. |
|
Safer Handling |
A square profile is easier to grip and position than round dowels, reducing slips during assembly. |
Ease Of Use
|
Feature |
Ease Level |
|---|---|
|
Cutting |
Moderate |
|
Sanding |
Easy |
|
Finishing |
Easy |
|
Mounting |
Moderate |
Versatility
These square dowels adapt to structural, decorative, and mounting roles; you can trim them, rout grooves for wire, or use short sections as external supports for heavier decorative assemblies.
Key Benefits
- Straight, consistent grain for accurate joins
- Sturdy 1-inch thickness supports mounting hardware
- Unfinished birch accepts paint, stain, and glue well
- Low warp risk for long-term projects
Retailer rating snapshot: 4.6/5 (about 352+ reviews in the source capture; current figures may differ).
DAS Clay

This DAS air-hardening clay is the go-to when you want detailed, kiln-free pieces for your half-moon hangers. You can shape fine textures, smooth edges, and make planned holes or recesses before leaving pieces to dry at room temperature. It responds well to water for blending and holds detail so embossed patterns or stamped textures read clearly once set. For weekend projects, classroom sessions, or making small batches for a craft fair, it gives you a convenient no-oven workflow and a surface that can be finished after it is fully dry.
What People Say
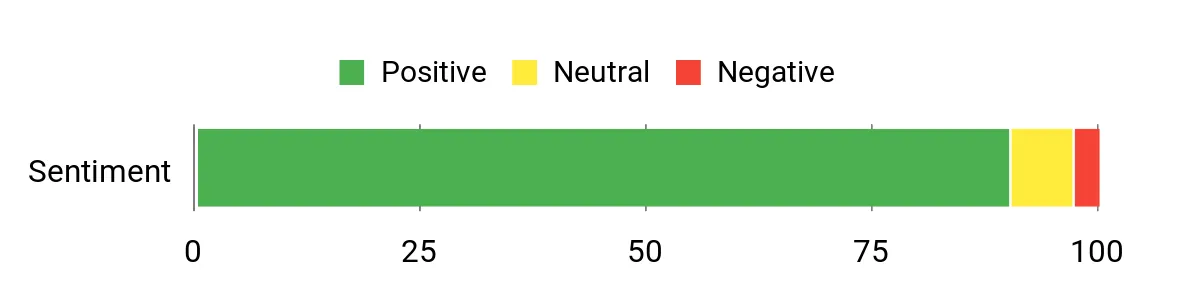
Customers frequently note how workable the clay is straight from the package and how well it captures details when handled and dried carefully. Many users appreciate the convenience of air drying and the ability to sand or paint finished pieces at home. The block size and consistency also get regular mention as useful for both small and slightly larger projects.
Overall Sentiment: Positive
Use Cases
|
Situation |
How It Helps |
|---|---|
|
Quick Prototypes |
You can model a half-moon shape and test proportions without waiting for kiln access, speeding up design iterations. |
|
Classroom Or Group Workshops |
Participants can shape and detail pieces in one session, then allow them to dry fully before sanding, painting, sealing, or assembly. |
|
Textured Or Detailed Pieces |
The clay holds stamps, impressed lines, and carved details so patterns remain visible after drying. |
DIY Tips
Knead the block until uniformly soft, then roll or press to your target thickness. Use a template to cut consistent half-moon shapes and add any planned openings for cord, wire, jump rings, or other hanging hardware while the clay is workable.
Let pieces dry flat in a ventilated area and follow the package directions for full drying before sanding or painting. Once fully dry, sand lightly, paint if desired, and apply only a finish that is compatible with the paint and clay.
Environmental Considerations
These are practical waste-reduction considerations, not a full lifecycle assessment of the product.
|
Impact |
Benefit |
|---|---|
|
No Kiln Energy |
Air-drying avoids kiln firing for this project. |
|
Reusable Offcuts |
Fresh trimmings can sometimes be incorporated back into the working clay before they dry, reducing material waste. |
|
Simple Cleanup |
Routine water-based cleanup can reduce the need for solvent cleaners. |
Health & Safety Considerations
These points describe workflow and exposure considerations, not medical or therapeutic benefits.
|
Consideration |
Description |
|---|---|
|
No Oven Curing |
Air-dry clay avoids the hot-oven step required by polymer clay. |
|
Water-Based Cleanup |
Basic tool cleanup generally requires water rather than strong solvent cleaners. |
|
Workable Texture |
A soft clay is easier to shape, but stop and rest if repetitive hand work becomes uncomfortable. |
Ease Of Use
|
Feature |
Ease Level |
|---|---|
|
Conditioning |
Easy |
|
Shaping |
Easy |
|
Drying Time |
Moderate |
|
Finishing |
Easy after full drying |
Versatility
Works for sculpting, stamping, molding, and pre-forming planned holes or recesses; once fully dry it can be sanded and painted, with a compatible sealer added if desired.
Key Benefits
- Air-dries so you do not need a kiln
- Soft and easy to shape
- Accepts impressed and carved surface details
- Can be sanded and painted after full drying
Retailer rating snapshot: 4.6/5 (about 43,707+ reviews in the source capture; current figures may differ).
Darice Dowels

You get a simple pack of slender wooden dowels that fit many light craft tasks. They are thin enough for macramé accents and decorative hanging bars while staying easy to cut for small mixed-media projects.
Because they arrive unfinished, you can paint, stain, or glue them to match your half-moon hangers. For clay projects, treat them primarily as external rods, spacers, or display components rather than forcing them into already hardened clay.
What People Say
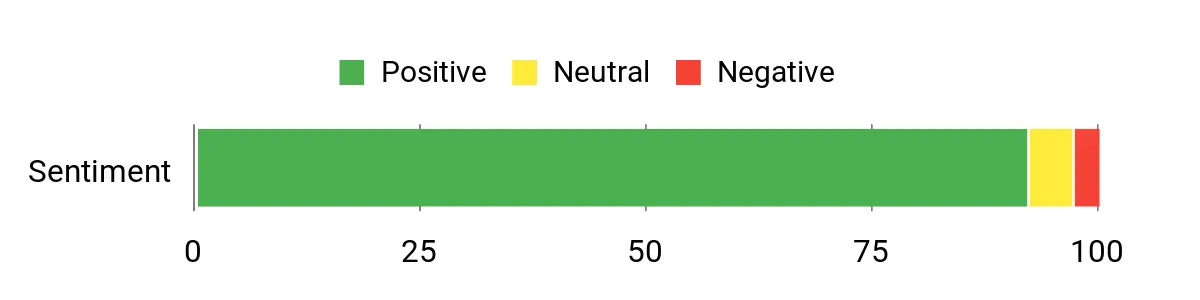
Buyers often mention that the dowels arrive straight and uniform, which matters when you need multiple similar pieces. Reviews highlight versatility for crafts and small supports, while some users note that their thin size is not suited to heavy-duty structural work.
Overall Sentiment: Positive
Use Cases
|
Situation |
How It Helps |
|---|---|
|
Macramé Or Trim Accents |
Use the dowels as decorative rods or anchors in woven hangings where a slim profile adds structure without bulk. |
|
External Supports |
Use short lengths as light external spacers, hanging bars, or reinforcement in a separate backer. Plan holes and attachment points before the clay dries or cures. |
|
Modeling And Small Repairs |
They can serve as easy-to-cut stabilizers or replacement dowels for lightweight craft builds. |
DIY Tips
Mark cuts carefully and use an appropriate fine-tooth cutting tool for clean ends, then sand the edges smooth. If a design needs a recessed wooden component, plan that recess while the clay is workable instead of modifying brittle finished clay later.
Finish visible wooden surfaces before final assembly when that makes the project easier to handle.
Environmental Considerations
These are practical waste-reduction considerations, not a full lifecycle assessment of the product.
|
Impact |
Consideration |
|---|---|
|
Natural Material |
The rods are made from wood; actual sourcing and environmental impact depend on the manufacturer and supply chain. |
|
Using Offcuts |
Save short leftovers for later craft details instead of discarding usable pieces. |
|
Finishing Choice |
Select finishes based on compatibility and manufacturer safety guidance rather than assuming any coating is environmentally preferable. |
Health & Safety Considerations
These points describe workflow and exposure considerations, not medical or therapeutic benefits.
|
Consideration |
Description |
|---|---|
|
Cutting |
Secure the dowel before cutting and keep fingers clear of the blade path. |
|
Sanding Dust |
Contain sanding dust and clean the work area when finished. |
|
Light-Duty Size |
Use these thin dowels only where their size is appropriate; they are not a substitute for structural wall hardware. |
Ease Of Use
|
Feature |
Ease Level |
|---|---|
|
Cutting |
Moderate |
|
Sanding |
Easy |
|
Finishing |
Easy |
|
Attaching As External Support |
Moderate |
Versatility
These dowels fit decorative and functional roles such as trim, tiny hanging rods, external spacers, and small repairs. You can cut, paint, glue, or combine them to suit many half-moon hanger designs.
Key Benefits
- Consistent small diameter for repeatable craft work
- Unfinished surface accepts many compatible craft finishes
- Lightweight for decorative supports and accents
- Multiple pieces per pack for batch projects or backups
Retailer rating snapshot: 4.7/5 (about 2,930+ reviews in the source capture; current figures may differ).
Sculpey Softener

When polymer clay is genuinely dry or crumbly after normal conditioning, Sculpey’s Liquid Clay Thinner & Softener is made to restore workability and thin Liquid Sculpey. The manufacturer says to add it slowly—one drop at a time—because too much can make clay mushy. The bottle contains 1 fl oz and uses a twist cap for controlled flow.
What People Say
Customers commonly value how effectively a small amount softens clay and makes it usable again. Many mention the controlled dispensing and usefulness for both firm polymer clay and liquid-clay workflows.
A small number note the product can be messy if over-applied, so gradual application matters.
Overall Sentiment: Positive
Use Cases
|
Situation |
How It Helps |
|---|---|
|
Rescuing Dry Or Crumbly Clay |
Add one drop at a time and knead, stopping as soon as the clay reaches the needed consistency. |
|
Thinning Liquid Sculpey |
Add a few drops gradually and stir gently until the desired flow is reached. |
|
Conditioning Before Blending |
A small amount can make genuinely dry polymer clay easier to condition before colors are blended. |
How To Use
First condition the clay normally. If it remains dry or crumbly, add the softener one drop at a time, fold and knead, then reassess. Sculpey recommends gradual addition and says excess softener can be leached by pressing the clay between sheets of paper under weight.
Environmental Considerations
These are practical waste-reduction considerations, not a full lifecycle assessment of the product.
|
Impact |
Consideration |
|---|---|
|
Extending Clay Use |
Restoring genuinely dry clay may prevent otherwise usable material from being discarded. |
|
Controlled Dosing |
One-drop-at-a-time application reduces unnecessary product use. |
|
Purpose-Built Additive |
Using a product designed for polymer clay avoids improvised softening methods that may be incompatible with the material. |
Health & Safety Considerations
These points describe workflow and exposure considerations, not medical or therapeutic benefits.
|
Consideration |
Description |
|---|---|
|
Protect Surfaces |
Sculpey warns that clay softener can damage some surfaces, so work on a protected clay-safe area. |
|
Use Gradually |
Small additions make consistency easier to control and reduce messy over-application. |
|
Clay-Only Workflow |
Keep polymer-clay tools and surfaces dedicated to craft use. |
Ease Of Use
|
Feature |
Ease Level |
|---|---|
|
Applying |
Easy |
|
Controlling Dosage |
Easy |
|
Working Into Clay |
Moderate |
|
Correcting Overuse |
Moderate |
Versatility
Useful for firm polymer clay that remains dry after conditioning and for thinning Liquid Sculpey when directed by the manufacturer.
Key Benefits
- Helps restore dry or crumbly polymer clay
- Twist cap supports controlled application
- Can thin Liquid Sculpey
- Purpose-made formula for polymer-clay conditioning and thinning
Retailer rating snapshot: 4.7/5 (about 2,354+ reviews in the source capture; current figures may differ).
EBOOT Geometry

If you want clean, repeatable arcs and exact angles for templates and layout work, this compact geometry set is a handy studio companion. You can draw consistent half-moon guides, mark hanging-hole locations, and transfer measured curves onto cardstock before cutting clay.
The protractor and compass are most useful here as inexpensive pattern-making tools rather than specialist clay equipment.
What People Say
Users frequently praise the readable protractor markings and the compass for ordinary drawing work. Many appreciate the included case, while some reviews describe the lightweight construction as better suited to occasional rather than heavy workshop use.
Overall Sentiment: Positive
Use Cases
|
Situation |
How It Helps |
|---|---|
|
Template Layout |
Trace repeatable half-moon templates and circle guides before transferring the shape to clay. |
|
Marking Hanging Holes |
Use measured reference points to place holes more consistently across matching pieces. |
|
Workshops And Classes |
Familiar geometry tools make pattern-making easier without specialized clay equipment. |
DIY Tips
Set the compass to the radius you want and trace half-moon curves on cardstock. Use the protractor or ruler to check symmetry and mark attachment points. Transfer the paper guide to clay and confirm hole placement before drying or baking.
Environmental Considerations
These are practical waste-reduction considerations, not a full lifecycle assessment of the product.
|
Impact |
Consideration |
|---|---|
|
Reusable Tool |
A reusable template tool can replace repeated freehand measurement. |
|
Compact Kit |
Keeping the pieces together in one case reduces lost parts and unnecessary replacement. |
|
Care |
Lightweight plastic tools last longer when stored carefully and not forced. |
Health & Safety Considerations
These points describe workflow and exposure considerations, not medical or therapeutic benefits.
|
Consideration |
Description |
|---|---|
|
Compass Point |
Handle the pointed compass leg carefully and store it closed or in its case. |
|
Less Rework |
Accurate layout can reduce unnecessary trimming or sanding later. |
|
Organized Workspace |
Keeping small components in their case makes them easier to locate and store safely. |
Ease Of Use
|
Feature |
Ease Level |
|---|---|
|
Reading Markings |
Easy |
|
Setting Radius |
Easy |
|
Adjusting Compass |
Moderate |
|
Durability |
Moderate |
Versatility
Good for drafting templates, checking angles, and creating repeatable curves across papercraft and clay-layout projects.
Key Benefits
- Useful for repeatable circle and half-moon templates
- Compact set keeps components together
- Helps standardize hanging-hole placement
- Portable for small workspaces
Retailer rating snapshot: 4.3/5 (about 5,339+ reviews in the source capture; current figures may differ).
3M Sandpaper

Fine-grit 3M aluminum-oxide sheet sandpaper is useful for refining cured clay edges and smoothing wooden supports. Cut a small piece for detail work or wrap it around a sanding block for flatter edges.
The original source labels this Amazon item as 150 grit, but that exact grit/ASIN pairing was not independently confirmed from 3M’s current product information. Treat the listing as a fine-grit finishing option and verify the current grit on the package or retailer page before buying.
What People Say
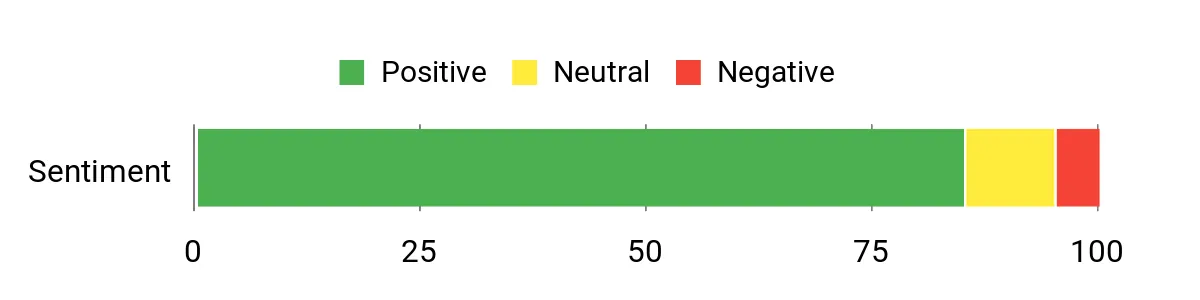
Users commonly praise the abrasive consistency and usefulness for small finishing jobs. Some buyers mention less expensive alternatives, so the main reason to choose it is familiarity with the 3M brand and convenient sheet format rather than a unique capability.
Overall Sentiment: Positive
Use Cases
|
Situation |
How It Helps |
|---|---|
|
Smoothing Clay Edges |
Use an appropriate fine grit to refine fully cured or dry clay edges with light pressure. |
|
Preparing Wood Dowels |
Lightly smooth cut dowel ends or surfaces before finishing or assembly. |
|
Finishing Painted Surfaces |
Only sand a coating when its manufacturer recommends that technique; not every varnish should be sanded between coats. |
DIY Tips
Start with a light pass along the contour of your half-moon piece using a sanding block or folded sheet for control. Keep strokes even and check frequently so you do not remove more material than necessary.
Use the grit that matches the amount of material you need to remove, then progress to finer abrasives if you want a smoother finish. For polymer clay, collect sanding dust on scrap paper and dispose of it rather than washing it into the sink.
Environmental Considerations
These are practical waste-reduction considerations, not a full lifecycle assessment of the product.
|
Impact |
Consideration |
|---|---|
|
Cut-to-Size Use |
Cut only the amount needed for small details so the rest of the sheet stays usable. |
|
Mechanical Finishing |
Abrasive finishing can sometimes correct small imperfections without additional coating products. |
|
Multi-Material Use |
A suitable abrasive sheet may serve several compatible craft materials. |
Health & Safety Considerations
These points describe workflow and exposure considerations, not medical or therapeutic benefits.
|
Consideration |
Description |
|---|---|
|
Dust Control |
Contain sanding dust and clean the workspace after finishing. |
|
Polymer-Clay Dust |
Sculpey recommends collecting sanding dust on scrap paper and not washing it down the sink. |
|
Light Pressure |
Gentle sanding helps prevent accidental gouges and reduces unnecessary dust. |
Ease Of Use
|
Feature |
Ease Level |
|---|---|
|
Cutting To Size |
Easy |
|
Hand Sanding |
Easy |
|
Using With Block |
Easy |
|
Choosing The Correct Grit |
Moderate |
Versatility
Useful for light finishing on fully cured clay, smoothing wooden dowels, and other compatible craft surfaces when the grit is appropriate for the task.
Key Benefits
- Fine-grit abrasive format suited to controlled finishing; verify the exact current grit before purchase
- Cut-to-size sheets fit blocks or detail work
- Aluminum-oxide abrasive is common for general finishing
- Useful across several compatible craft materials
Retailer rating snapshot: 4.6/5 (about 1,804+ reviews in the source capture; current figures may differ).
Liquitex Varnish

For acrylic-painted pieces, Liquitex BASICS Matte Varnish is a water-based permanent matte varnish that the manufacturer says dries clear, stays flexible, resists yellowing, and protects acrylic surfaces. Use it only after the paint is fully dry and only on compatible acrylic surfaces.
If you are sealing an acrylic-painted hanger, the important point is to follow Liquitex’s application method rather than a generic craft-varnish technique.
What People Say
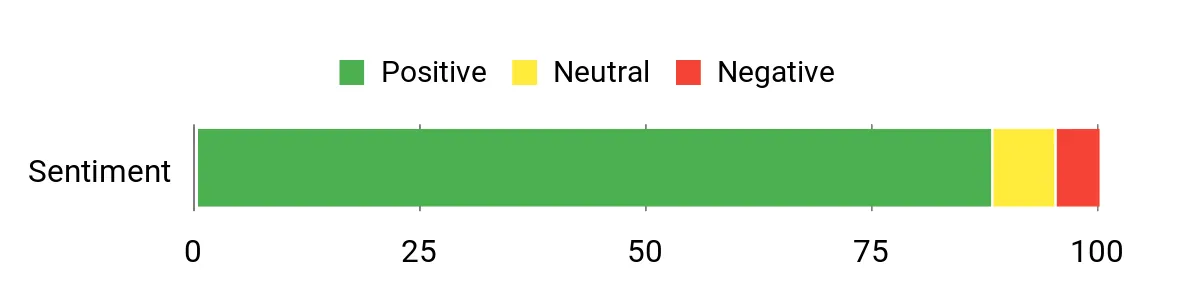
Users frequently praise the clear matte appearance and protection it gives acrylic-painted surfaces. Some note that the 250 ml bottle is relatively small for frequent or large-scale use.
Overall Sentiment: Positive
Use Cases
|
Situation |
How It Helps |
|---|---|
|
Sealing Acrylic-Painted Clay |
Apply over a fully dry compatible acrylic-painted surface to create a permanent matte protective layer. |
|
Coating Acrylic-Painted Mixed-Media Pieces |
Use only where the exposed finish is a compatible acrylic surface; Liquitex advises against using this varnish with non-acrylic media. |
|
Small Batches |
The 250 ml container suits small craft runs better than large-volume coating work. |
How To Use
Make sure the acrylic paint is fully dry. Place the piece flat and varnish horizontally. Stir gently, use a large soft brush, and apply long, even strokes. Liquitex allows up to three thin coats with at least three hours between coats.
Work in a clean, well-ventilated area. Do not use a roller or sponge brush, do not apply one thick coat, and do not repeatedly brush back over areas that have started to set, because the manufacturer warns these techniques can cause clouding or an uneven finish.
Environmental Considerations
These are practical use considerations, not a lifecycle assessment of the varnish.
|
Impact |
Consideration |
|---|---|
|
Thin Coats |
Following the recommended thin-coat method avoids unnecessary over-application. |
|
Correct Quantity |
A smaller container can make sense when you only varnish occasional small projects. |
|
Durable Finish |
A correctly applied protective layer can reduce the need to repeatedly touch up the painted surface. |
Health & Safety Considerations
These points describe workflow and exposure considerations, not medical or therapeutic benefits.
|
Consideration |
Description |
|---|---|
|
Ventilation |
Liquitex recommends working in a well-ventilated space. |
|
Brush Application |
A large soft brush is the manufacturer-recommended application tool for this varnish. |
|
Compatibility |
Do not use the varnish with non-acrylic media unless the manufacturer confirms compatibility. |
Ease Of Use
|
Feature |
Ease Level |
|---|---|
|
Applying |
Easy with correct brush technique |
|
Dry Time |
Moderate |
|
Waiting Between Coats |
Moderate |
|
Cleanup |
Follow label directions |
Versatility
Suitable for compatible acrylic-painted surfaces on rigid or flexible supports. Check compatibility first when a project combines clay, wood, paper, or other materials, because Liquitex says not to use this varnish with non-acrylic media.
Key Benefits
- Permanent matte finish for compatible acrylic surfaces
- Dries clear and is designed to resist yellowing
- Apply with a large soft brush in thin coats
- Allow at least three hours between thin coats
Retailer rating snapshot: 4.6/5 (about 1,374+ reviews in the source capture; current figures may differ).
Royal Sponges

These synthetic artist sponges are useful for textured paint effects, washes, light cleanup, and other craft work. You can cut or tear them to create different stippled patterns on painted half-moon pieces.
They are not a universal varnish applicator. In particular, Liquitex specifically advises against applying BASICS Matte Varnish with a sponge brush.
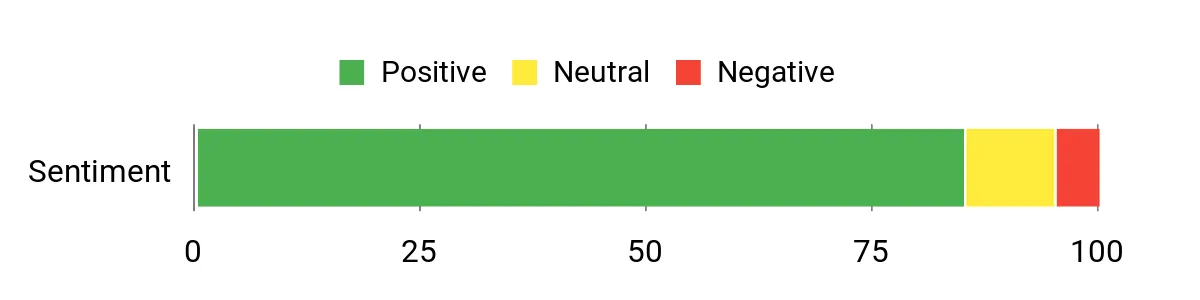
What People Say
Customers often point out the sponges’ usefulness for paint textures and their ability to be cut into smaller shapes. Many users also mention repeat use across painting and pottery-related craft tasks.
Overall Sentiment: Positive
Use Cases
|
Situation |
How It Helps |
|---|---|
|
Creating Surface Texture |
Dab or press the sponge to add irregular or repeatable texture to compatible painted surfaces. |
|
Applying Paint Washes |
A lightly loaded sponge can create soft, broken-color effects without obvious brush strokes. |
|
Cleanup |
A damp sponge can help wipe suitable work surfaces during water-based craft cleanup. |
How To Use
Cut or tear a sponge to the shape you need. Load it lightly for washes or more heavily for stippling, and test the effect on a scrap piece before applying it to a finished hanger.
Rinse appropriately after water-based paint use and squeeze gently rather than twisting the foam aggressively.
Environmental Considerations
These are practical waste-reduction considerations, not a full lifecycle assessment.
|
Impact |
Consideration |
|---|---|
|
Reusable Tool |
Cleaning and reusing a sponge can reduce disposable applicator use for compatible paints. |
|
Cut-to-Size Use |
Small pieces can be cut for detail work while leaving the rest intact. |
|
Service Life |
Replace foam when it begins to break down or contaminate the finish. |
Health & Safety Considerations
These points describe workflow considerations, not medical benefits.
|
Consideration |
Description |
|---|---|
|
Paint Compatibility |
Use the sponge only with coatings and cleaners that permit sponge application. |
|
Dust Cleanup |
A damp sponge may help collect ordinary surface dust, but follow material-specific disposal guidance. |
|
Finish Contamination |
Keep separate sponges for incompatible materials or colors when cross-contamination would affect the result. |
Ease Of Use
|
Feature |
Ease Level |
|---|---|
|
Cutting To Shape |
Easy |
|
Applying Paint |
Easy |
|
Cleaning |
Easy for compatible water-based materials |
|
Longevity |
Moderate |
Versatility
Handy for texture, washes, and compatible cleanup tasks. Do not use these sponges to apply Liquitex BASICS Matte Varnish, because Liquitex specifically advises against sponge-brush application for that varnish.
Key Benefits
- Can be cut or shaped for custom textures
- Useful for paint washes and stippling
- Reusable with compatible water-based materials
- Simple tool for mixed-media surface effects
Retailer rating snapshot: 4.5/5 (about 2,022+ reviews in the source capture; current figures may differ).
V TOWER Pin
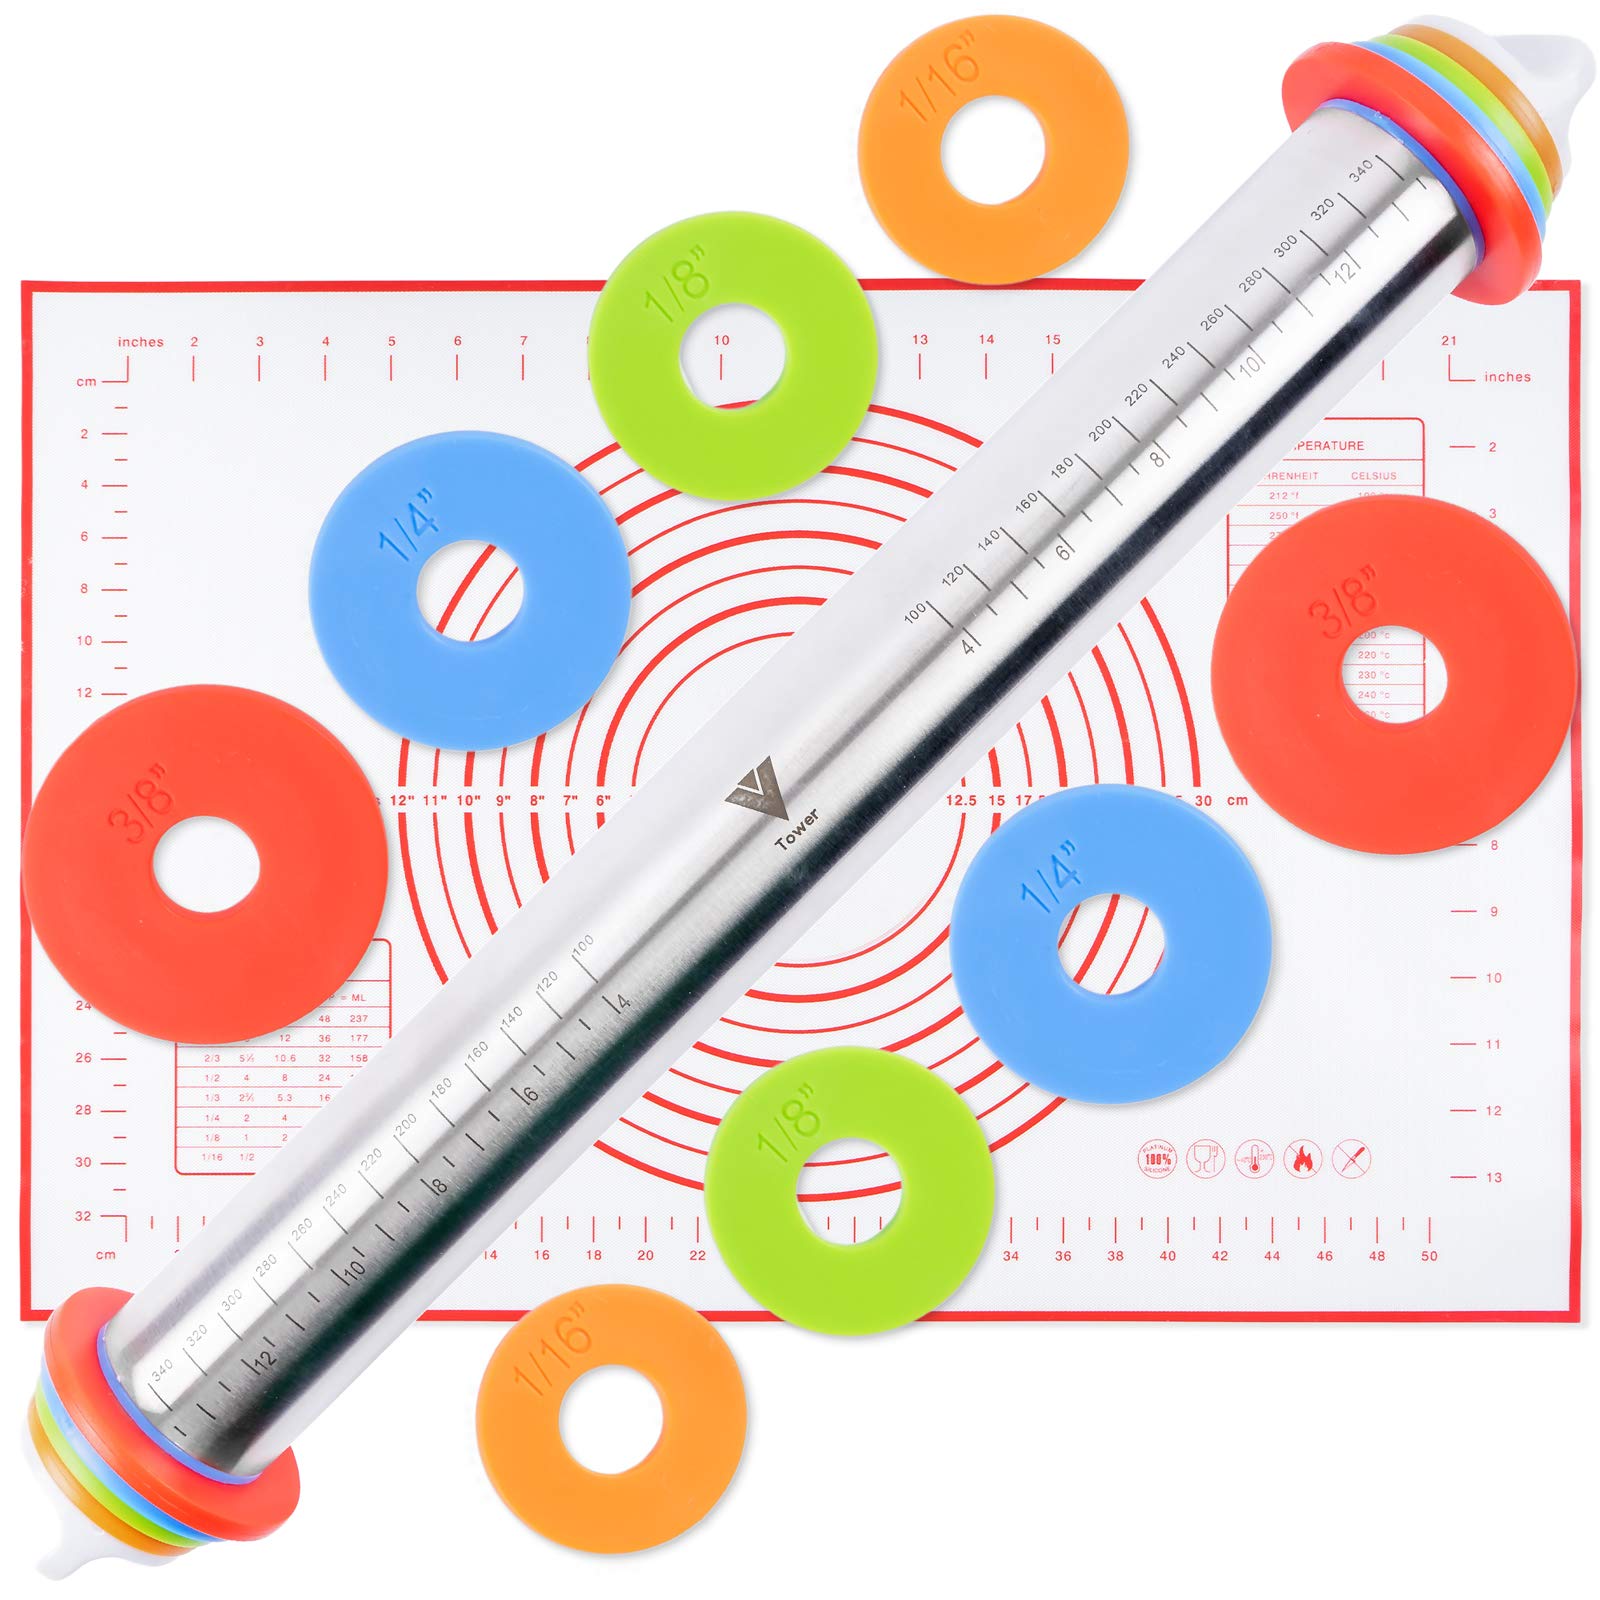
This adjustable stainless-steel rolling pin and silicone-mat set is useful when you want repeatable slab thickness across several clay pieces. The rings act as thickness stops, while the mat gives you a contained work area for measuring and cutting.
If you use this set with polymer clay, dedicate the pin and mat to clay work. Sculpey advises using dedicated tools and work surfaces for polymer clay rather than returning them to food preparation.
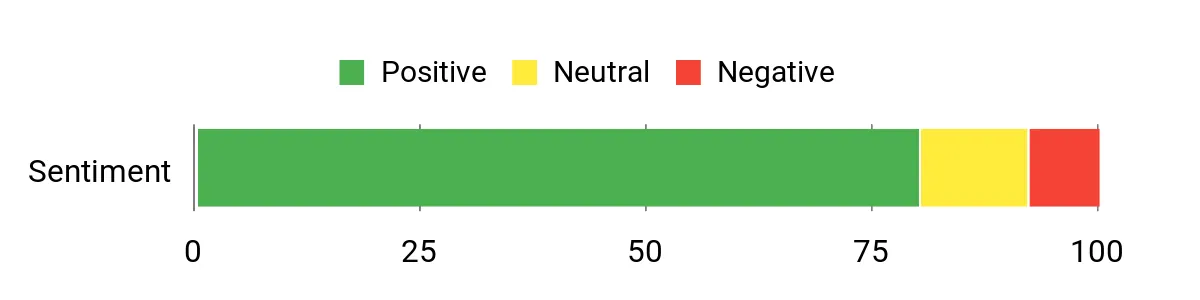
What People Say
Users appreciate the thickness-control rings and smooth stainless rolling surface. Some buyers mention a short learning curve in applying even pressure and placing the rings correctly.
Overall Sentiment: Positive
Use Cases
|
Situation |
How It Helps |
|---|---|
|
Rolling Uniform Clay Slabs |
Set the thickness rings so several half-moons start with a similar slab thickness. |
|
Small Batch Production |
Thickness stops make it easier to repeat the same setup across several pieces. |
|
Dedicated Clay Rolling Setup |
Use the pin and mat as a dedicated clay set so polymer-clay residues are not transferred back to food-preparation tools. |
How To Use
Choose the ring height for your desired thickness, secure matching rings on both ends, and roll from the center outward with even pressure. Check the slab against your template between passes and clean the set according to its product directions after use.
Environmental Considerations
These are practical waste-reduction considerations, not a full lifecycle assessment.
|
Impact |
Consideration |
|---|---|
|
Reusable Tools |
A durable roller and mat can be reused across many clay sessions. |
|
Multi-Step Craft Use |
One dedicated craft set can handle rolling, measuring, and cleanup across repeated clay projects without returning it to food preparation. |
|
Storage |
Keeping the rings together with the pin reduces lost components and unnecessary replacement. |
Health & Safety Considerations
These points describe workflow considerations, not medical benefits.
|
Consideration |
Description |
|---|---|
|
Dedicated Use |
Keep the roller and mat for polymer-clay craft work rather than returning them to food preparation. |
|
Stable Workspace |
Roll on a flat surface so the pin and thickness rings track evenly. |
|
Cleaning |
Follow the product’s cleaning instructions and remove clay residue before storage. |
Ease Of Use
|
Feature |
Ease Level |
|---|---|
|
Setting Rings |
Moderate |
|
Rolling Evenly |
Moderate |
|
Cleaning |
Easy |
|
Storage |
Easy |
Versatility
Useful for clay slab work and other non-food craft rolling tasks where repeatable thickness matters. If polymer clay is involved, keep the tools dedicated to clay.
Key Benefits
- Adjustable rings help standardize slab thickness
- Stainless-steel body is easy to wipe clean
- Silicone mat creates a contained work area
- Useful for repeatable clay rolling when kept as a dedicated craft tool
Retailer rating snapshot: 4.4/5 (about 4+ reviews in the source capture; current figures may differ).
Frequently Asked Questions
Can I bake polymer clay on a work mat?
Yes, if the mat is designed for oven use. Sculpey says its Oven-Safe Work Mat can go from the work surface to a baking sheet and should not be used above 550°F (287°C). The clay itself must still be baked at the exact time and temperature printed on its package, with an oven thermometer used to verify the baking-zone temperature.
How do I avoid cracking or warping during drying?
Keep the slab thickness even, avoid very thin material around hanging holes, and dry air-dry clay flat according to the package directions. For polymer clay, condition it fully and follow its package baking instructions. Make holes and planned attachment points while the clay is workable so you do not have to force hardware into a fragile finished piece.
Which tools give the most consistent results?
A template or compass controls the curve, a thickness-ring roller controls slab thickness, a dedicated blade controls the edge, and a hole-making tool keeps attachment points repeatable. Fine abrasive paper refines cured edges, while a compatible finish protects painted surfaces.
Should I use the same rolling pin for food and polymer clay?
No. Sculpey advises keeping tools and work surfaces dedicated to clay. If a food-use baking surface is used, the manufacturer says to place a barrier such as parchment paper or foil between the clay and the surface.
When should I make the hanging holes?
Make holes while the clay is still workable whenever possible. Position them far enough from the edge to leave a strong rim of material, then test the hole size with the cord, wire, or jump ring you plan to use before drying or curing the piece.
Which Supply Fits Which Need
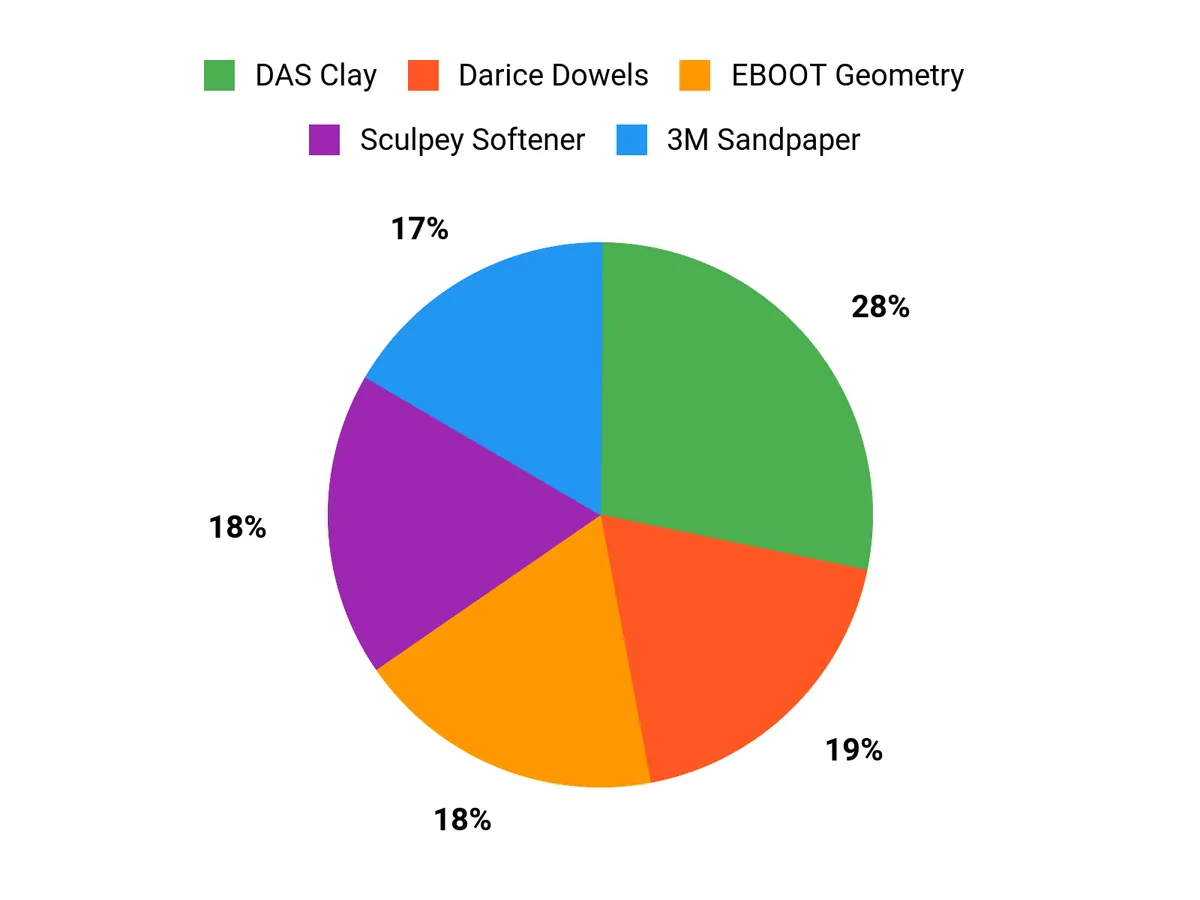
Choose by the job you actually need to solve. The Sculpey mat is strongest here as a dedicated polymer-clay work-and-bake surface; the Woodpeckers square dowel fits external display bars and sturdy backers; DAS is the straightforward no-oven clay option; Darice dowels suit lighter decorative bars; and the remaining tools cover conditioning, layout, edge finishing, varnishing, texture, and thickness control.
Sources
- Sculpey Tools Oven-Safe Work Mat — current size, oven-use guidance, 550°F maximum, cleanup, and dedicated-work-surface guidance.
- Sculpey Polymer Clay Baking Guide — oven thermometer, ventilation, oven-safe surfaces, and package-specific curing guidance.
- Sculpey FAQ — polymer-clay safety, dedicated tools, food-surface barriers, sanding-dust handling, and no-microwave guidance.
- Sculpey Clay Softener & Thinner — 1 fl oz size, gradual application, and intended conditioning/thinning use.
- Liquitex BASICS Matte Varnish — compatible surfaces, drying guidance, brush application, coat spacing, and sponge-brush warning.
- 3M Sandpaper & Sanding Screens — current manufacturer product-family reference for abrasive sheets and finishing use.
Wrapping Up
For a simple air-dry project, DAS clay plus a template, dedicated cutting tool, hole-making tool, fine abrasive, cord, and a compatible finish will cover the core workflow. For polymer clay, add a dedicated oven-safe work surface and an oven thermometer, then follow the clay package exactly.
Among the optional tools, the geometry set helps with repeatable curves, the thickness-ring roller helps with consistent slabs, Sculpey Softener can rescue genuinely dry polymer clay, and Liquitex varnish can protect fully dry acrylic-painted surfaces when applied with a soft brush. Choose only the tools that solve a real step in your process.
| Product Name | Image | Retailer Rating Snapshot | Material | Dimensions | Weight / Capacity |
|---|---|---|---|---|---|
| Polyform Sculpey Tools Oven-Safe Work Mat |
|
4.3/5 (288 reviews) Source-data snapshot; may change |
Silicone | 13″L x 7.75″W | 0.03 kg |
| DIY Wooden Square Dowel Rod 1-inch x 36 Pack of 2 |
|
4.6/5 (352 reviews) Source-data snapshot; may change |
Birch Wood | 36″L × 1″ × 1″ square profile | 1.5 pounds |
| DAS Modeling Clay Air Hardening, White, 2.2lb |
|
4.6/5 (43,707 reviews) Source-data snapshot; may change |
Clay | N/A | 2.2 pounds |
| Dowel Rod – Wood – 1/4 x 12 inches – 10 pieces |
|
4.7/5 (2,930 reviews) Source-data snapshot; may change |
Wood | 12″L x 0.25″ diameter | 0.16 pounds |
| Sculpey Clay Softener and Thinner 1floz Clear |
|
4.7/5 (2,354 reviews) Source-data snapshot; may change |
Clay softener/thinner | 3.88 x 1.19 x 1.19 inches | 1 fl oz |
| EBOOT Drawing Compass and 6 in Protractor Geometry Set |
|
4.3/5 (5,339 reviews) Source-data snapshot; may change |
Plastic / metal components | Retailer-listed dimensions; verify current package | 1.9 ounces |
| 3M Fine Grit Aluminum Oxide Sandpaper for Paint, Wood, & Metal |
|
4.6/5 (1,804 reviews) Source-data snapshot; may change |
Aluminum Oxide | Sheet format; verify current grit/pack on listing | Retailer-listed package weight may vary |
| Liquitex BASICS Matte Varnish, 250ml |
|
4.6/5 (1,374 reviews) Source-data snapshot; may change |
Water-based acrylic varnish | N/A | 250 ml |
| Royal Brush Synthetic Artist Sponges, 3/Pack |
|
4.5/5 (2,022 reviews) Source-data snapshot; may change |
Foam | Retailer-listed package dimensions | 9.07 g |
| Rolling Pin With Thickness Rings and Silicone Baking Pastry Mat Set |
|
4.4/5 (4 reviews) Source-data snapshot; may change |
Stainless Steel / Silicone | N/A | Retailer-listed package weight; verify current listing |
This roundup is reader-supported. When you click qualifying affiliate links, we may earn a referral commission at no additional cost to you. Product availability, prices, ratings, and review counts can change.