A broken drawer slide in a TV stand cabinet can often be fixed without replacing the entire drawer. Start by emptying the drawer and identifying the type of slide you have. Then check for debris, loose screws, misalignment, damaged mounting holes, bent metal, cracked rollers, or a damaged wooden guide. Replace the hardware only when it is bent, broken, badly worn, or no longer holds alignment.
Quick Answer
To fix a broken drawer slide, remove the drawer using the release method designed for that slide, clean the track, tighten loose hardware, and correct any misalignment. Repair loose mounting holes if needed. Replace slides that are bent, cracked, badly worn, or damaged beyond reliable adjustment.
Key Takeaways
- Identify the slide type before trying to remove the drawer; release methods vary.
- Clean first, then tighten and realign loose hardware before buying replacement parts.
- Do not use one clearance measurement or lubricant for every drawer-slide design.
- Repair stripped mounting holes only in sound material that can safely hold the fastener.
- Replace bent, cracked, heavily corroded, or badly worn slides with compatible hardware.
At a Glance
| Time Required | About 20–60 minutes for cleaning, tightening, alignment, or slide replacement; wood repairs may require additional adhesive curing time. |
| Difficulty | Beginner to intermediate |
| Tools Needed | Screwdriver, flashlight, vacuum or soft cloth, straightedge or level, tape measure, and optionally a drill, wood glue, clamps, and replacement hardware. |
| Cost | Low for cleaning and adjustment; higher if slides, brackets, fasteners, or damaged wood must be replaced. |
Warning: Empty and support the drawer before removing it. Keep fingers away from sharp slide edges and pinch points. If you cut or sand damaged wood, control the dust, protect your eyes, and use appropriate respiratory protection. Disconnect nearby electronics if your repair work could contact power cords or wiring.
Check the Damage First
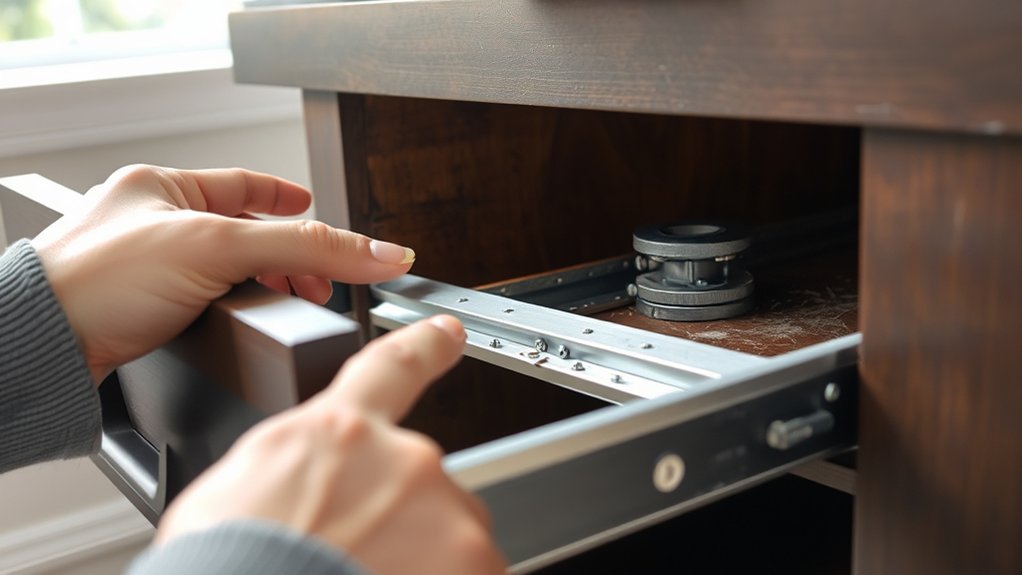
Begin with the drawer open and empty. Look along both sides and underneath it before removing anything. Check for visible damage on the glides, channels, rollers, locking devices, brackets, and mounting points.
Loose screws, bent metal, cracked plastic, worn rollers, damaged bearings, or misaligned hardware can cause binding, sagging, noise, or poor travel. Also look for dust, wood chips, cables, loose objects, or other obstructions in the drawer path.
Pay attention to the symptom. A drawer that sits crooked may have a loose or misaligned slide. Grinding or rough movement can point to debris, damaged rollers, damaged bearings, or a distorted rail. A drawer that drops on one side may have a loose bracket or failed mounting point.
Before removing the drawer, determine whether the damage is limited to a screw or bracket or affects the entire slide. Small mounting problems are often repairable. A severely bent, cracked, corroded, or worn slide is usually better replaced.
Identify the Drawer Slide Type Before Removal
Drawer removal methods are not all the same. Look at the hardware before pulling or tilting the drawer. Common systems include:
- Roller slides: Often use nylon wheels and may release when the drawer is extended and lifted or tilted.
- Side-mount ball-bearing slides: Often have release levers on the inner slide members.
- Undermount slides: May use locking devices or clips underneath the drawer.
- Friction or push-latch disconnect slides: Use a different release action.
- Non-disconnect slides: May require screws or mounting hardware to be removed before the drawer can come out.
- Wooden runners or center guides: Usually rely on wood-on-wood contact rather than metal telescoping hardware.
Accuride documents several drawer-slide disconnect methods, including lever, friction, push-latch, and rail disconnects. Blum concealed runners can use locking devices and lift-off stops rather than the tilt-down method used by some roller slides.
Pro Tip: Take a photo of both slides before removing the drawer. It makes it easier to reinstall brackets, spacers, and left/right hardware in their original positions.
Remove the Drawer and Inspect the Slide Track
Empty the drawer completely and extend it as far as the hardware allows. Release it according to the slide design instead of forcing it. If the hardware has a model number or manufacturer mark, use that information to confirm the correct release method.
Once removed, inspect the full track for bends, rust, loose hardware, missing components, damaged rollers, bearing problems, or obstructions that could affect movement.
Check both the drawer-mounted and cabinet-mounted parts. A slide that looks straight from one angle may still be twisted or mounted at a different height from the slide on the opposite side.
Remove Drawer Completely
For a simple roller slide, removal may involve extending the drawer and lifting or tilting it enough for the rollers to clear their stops. For a side-mount ball-bearing slide, look for release levers on the inner slide members. Some levers move in opposite directions on the left and right sides.
For undermount hardware, inspect underneath the drawer front for locking devices or clips. Release both sides before lifting the drawer from the runners. Do not pry against the drawer box if the release mechanism does not move easily.
If the slide does not have a disconnect feature, check the installation instructions before removing screws. Supporting the drawer while removing hardware prevents its weight from tearing screws from the cabinet.
Check Slide Track
With the slide track exposed, inspect it along its full length. Look for bending, corrosion, loose screws, damaged stops, missing bearings, cracked rollers, or uneven spacing.
Check that both sides are mounted securely and at matching heights. A straightedge or level can help reveal an obvious tilt, but the slide does not need an arbitrary universal gap. Required clearance depends on the exact slide design.
Some common side-mount ball-bearing slides require about 1/2 inch of side clearance per side, while other designs use different dimensions. Always measure the original installation and check the replacement-slide specification instead of using one clearance number for every drawer.
Look For Damage
Inspect the exposed track from front to back. Pay particular attention to:
- Bent or twisted rail sections
- Cracked plastic rollers or retainers
- Missing or damaged bearings
- Loose screws and brackets
- Elongated or stripped mounting holes
- Rust or corrosion
- Broken stops or disconnect levers
- Splintered wood around mounting points
A rail that is badly bent, cracked, or missing important moving parts is generally more reliable to replace than to reshape. Minor mounting problems can often be corrected without replacing the full slide.
Diagnose the Problem by Symptom
The way the drawer fails can narrow down the cause before you replace anything.
- Drawer sticks at one point: Look for debris, a bent rail, a protruding screw, or a damaged roller.
- Drawer sits crooked: Check mounting screws, brackets, cabinet squareness, and whether the slides are installed at matching heights.
- Drawer drops on one side: Inspect the bracket, mounting holes, locking device, and drawer-side hardware on that side.
- Drawer grinds or feels rough: Check for contamination, damaged bearings or rollers, corrosion, or missing lubrication where the manufacturer specifies it.
- Drawer will not close fully: Look for an obstruction, a shifted slide, a bent stop, incorrect reassembly, or a damaged soft-close mechanism.
- Drawer opens by itself: Check cabinet level, slide alignment, damaged detents, and self-closing components.
Clean Out Debris and Obstructions
The drawer should be fully removed when the design allows it so you can see the complete travel path. Vacuum loose dust, crumbs, wood chips, and other debris from the cabinet and runner area first.
Do not automatically scrub grease out of bearing races. Hettich advises preserving factory-applied grease on moving components and recommends vacuuming drawer runners. Blum also recommends gentle cleaning of its fittings with a soft, slightly damp cloth rather than aggressive cleaners.
Remove Drawer First
Empty the drawer before cleaning so its weight does not fight the release mechanism. Remove it using the correct disconnect method for the installed hardware.
With the drawer out, inspect the cabinet interior for loose stored items, cables, screws, splinters, compacted dirt, or objects that may be entering the slide path.
If access is poor, remove an adjacent drawer only when its release method is understood. Do not force neighboring drawers simply to gain access.
Clear Slide Path
With the drawer removed, clean the slide path methodically:
- Vacuum loose dirt and debris from both sides.
- Remove lodged objects without bending the slide.
- Wipe accessible non-greased surfaces with a soft cloth.
- Preserve factory grease unless the manufacturer instructs you to clean and re-lubricate the raceway.
- Dry any damp surfaces before reinstalling the drawer.
- Reinstall the drawer and test for friction.
If the drawer becomes smooth after cleaning, no further repair may be necessary. If it still binds, continue with fastener and alignment checks.
Tighten Loose Screws and Realign the Slide
Inspect every mounting screw on both the drawer and cabinet. Tighten loose fasteners until secure, but do not over-tighten them into wood, MDF, or particleboard. Over-driving a screw can strip the hole and make the slide less secure.
Next, compare the position of the left and right slides. They should follow the geometry required by that hardware system and remain parallel enough for the drawer to travel without binding.
Do not rely on a universal 3/32- to 1/8-inch gap. Side clearance varies by design. Measure the drawer opening, drawer width, existing slide thickness, and the manufacturer-specified clearance for the installed or replacement slide.
If the hardware uses slotted mounting holes, loosen the screws slightly, make a small adjustment, and retighten them. Test after each adjustment rather than moving the rail a large distance at once.
Note: If one rail repeatedly shifts out of alignment after tightening, the problem may be a stripped mounting hole, damaged bracket, weak cabinet material, or bent slide rather than simple adjustment.
Fix Stripped Holes or Broken Brackets
If tightening and realigning the slide does not restore smooth movement, inspect the mounting points closely. A screw that spins without tightening cannot hold the slide in position.
Choose the repair according to the cabinet material:
- Solid wood or plywood: A small stripped hole can often be rebuilt with glued hardwood toothpicks or, for a stronger repair, a properly fitted wood dowel and wood glue. Let the adhesive cure before drilling a new pilot hole.
- MDF or particleboard: Avoid repeatedly installing larger screws into crumbling material. A suitable threaded insert, repair plate, relocated mounting hole, or replacement panel may provide a more dependable repair.
- Broken bracket: Replace it with a compatible bracket designed for the same slide system and installation style.
- Remove the slide or bracket from the damaged mounting point.
- Remove loose wood fibers or crumbled material.
- Repair or reinforce the hole using a method suited to the cabinet material.
- Allow adhesive to cure fully when glue is used.
- Drill an appropriate pilot hole where needed.
- Reinstall the slide without over-tightening the screw.
A larger screw should only be used when its head fits the slide correctly, its diameter is suitable for the mounting hole, and its length will not break through the cabinet or interfere with moving parts.
Lubricate Drawer Slides for Easier Gliding
Lubrication can help some drawer slides, but the correct product depends on the hardware. There is no single lubricant that is best for every drawer-slide system.
For standard ball-bearing slides, Accuride’s maintenance procedure describes cleaning the slide and applying suitable grease to its raceways. Other manufacturers may use factory-applied grease intended to remain in place.
For a wood-on-wood slide channel, a small amount of beeswax or paraffin can reduce friction after the wood has been cleaned and repaired. Do not pack wax into ball-bearing races or soft-close mechanisms.
Use this sequence:
- Identify the slide manufacturer and type if possible.
- Remove loose dirt without stripping necessary factory grease.
- Apply only the lubricant recommended for that hardware.
- Use a small amount rather than soaking the mechanism.
- Cycle the drawer several times and wipe away excess material.
There is no universal requirement to lubricate drawer slides twice a year. Inspect them when movement becomes noisy, rough, or sticky and follow the hardware manufacturer’s maintenance guidance.
Repair a Damaged Wooden Slide Channel
If the TV stand uses a wooden slide channel or center guide, sticking can come from cracks, splinters, swelling, worn edges, or a broken guide rather than metal slide hardware.
Warning: Sawing and sanding can create airborne wood dust. OSHA identifies wood dust from cutting and sanding as a potential health hazard. Work in a ventilated area, control the dust at the source when possible, wear eye protection, and use appropriate respiratory protection for the task.
- Inspect the channel and mark the damaged area.
- Remove only loose or badly fractured material.
- For a clean break, rejoin sound pieces with an appropriate wood adhesive.
- If a section is missing, fit replacement wood that matches the guide’s original dimensions.
- Clamp the repair in alignment and allow the adhesive to cure completely.
- Sand only enough to remove proud edges or roughness that would catch the drawer.
- Test the drawer dry before applying any wax intended for wood-on-wood movement.
If the channel is crushed, badly warped, or no longer supports the drawer correctly, replacing the guide may be more reliable than building up a large damaged area with filler.
Replace Worn-Out Drawer Slides
Replace the slides when inspection shows severe bending, cracking, missing rollers or bearings, broken release hardware, heavy corrosion, or wear that cannot be corrected through cleaning and alignment.
Before buying replacement hardware, record:
- Slide type: roller, side-mount ball-bearing, undermount, center-mount, or another design
- Slide length
- Required side or bottom clearance
- Mounting position
- Drawer and cabinet material
- Bracket style
- Load rating
- Extension type: partial, full, or over-travel
- Disconnect method
- Soft-close, self-close, or push-to-open features if present
Do not assume that two slides of the same length are interchangeable. For example, different products can require different side clearances and mounting arrangements.
Remove the old hardware from both the drawer and cabinet. Keep reusable screws only if they are undamaged and correct for the new hardware. Position the new slides according to the manufacturer’s installation dimensions and tighten them securely without stripping the cabinet material.
Install replacement slides as a matched pair unless the manufacturer specifically allows individual replacement. Mixing different slide models can create unequal travel, height, resistance, or closing behavior.
Test the Drawer and Prevent Future Problems
After the drawer slide repair is complete, reinstall the drawer and test it while empty. Open and close it through its full normal travel several times.
Check for:
- Binding or sudden resistance
- Grinding, clicking, or scraping
- A drawer front that sits crooked
- One side releasing before the other
- Loose fasteners
- Unexpected movement in brackets or repaired mounting holes
If the empty drawer works correctly, add its normal contents gradually and test again. Keep the load reasonably balanced rather than concentrating heavy objects on one side.
For future maintenance:
- Remove debris before it accumulates around rollers or tracks.
- Retighten loose hardware when first noticed.
- Keep moisture away from metal hardware and unfinished wood.
- Do not exceed the load rating of the installed slides.
- Use only slide-appropriate lubricants or factory maintenance procedures.
A drawer that repeatedly falls out of alignment usually has an underlying mounting, hardware, or cabinet-material problem. Re-tightening the same loose screw over and over is not a lasting repair.
Frequently Asked Questions
How Do You Fix a Broken Drawer Slide?
Remove the drawer using the correct release method, inspect both slide members, clean out debris, tighten loose hardware, and correct alignment. Repair weak mounting points if necessary. Replace the slide if it is bent, cracked, badly worn, or missing important rollers, bearings, stops, or release parts.
How to Repair a Broken Cabinet Drawer?
First determine whether the problem is in the drawer box, slide, bracket, or cabinet mounting point. Tighten secure hardware, repair stripped holes in a way that suits the cabinet material, realign the slides, and repair cracked wood where practical. Replace structural or moving parts that cannot hold their original position.
How Do I Replace the Slides in My Cabinet Drawer?
Identify the existing slide type, remove the drawer, and record the slide length, mounting style, side or bottom clearance, bracket arrangement, and load requirements. Remove the old pair, install a compatible replacement pair according to its specified dimensions, reinstall the drawer, and test it empty before adding normal contents.
Can a Broken Drawer Be Fixed?
Yes. Many problems come from loose screws, debris, damaged mounting holes, misalignment, or repairable wood damage. A drawer may need new slides or brackets when moving components are bent, cracked, corroded, or badly worn. Severe damage to the drawer box or cabinet may require professional repair or replacement parts.
Why Does My Drawer Still Bind After I Tighten the Screws?
Binding after tightening usually means another problem remains. Check for a bent rail, debris, unequal slide height, cabinet distortion, damaged rollers or bearings, incorrect side clearance, or a mounting point that moves under load. Test the drawer after each correction so you can identify the actual cause.
Should I Lubricate Drawer Slides?
Only when the slide design and manufacturer call for it. Some ball-bearing slides use grease in their raceways, while other fittings rely on factory-applied lubrication that should not be removed. Wood-on-wood guides may benefit from a light wax. Identify the slide type before applying any lubricant.
Conclusion
A broken drawer slide in a TV stand cabinet is best repaired by identifying the hardware first and then correcting the actual fault. Debris, loose fasteners, weak mounting holes, damaged brackets, misalignment, and worn slides require different fixes. Avoid forcing an unfamiliar release mechanism or applying one clearance or lubricant rule to every slide. When hardware is badly bent, cracked, corroded, or worn, a correctly matched replacement pair is usually the most dependable repair.
Sources
- Accuride — Four Types of Slide Disconnect Methods — drawer-slide release mechanisms and disconnect types.
- Accuride — Cleaning and Lubricating Drawer Slides — maintenance guidance for standard ball-bearing slides.
- Blum — TANDEM Assembly and Installation — concealed-runner locking, adjustment, and attachment information.
- Hettich — Care Advice for Furniture Fittings — cleaning drawer runners and preserving factory-applied grease.
- Occupational Safety and Health Administration — Wood Dust — hazards associated with airborne wood dust from cutting and sanding.
- Rockler — Centerline 757A Drawer Slide Specifications — example of slide-specific mounting clearance and disconnect requirements.